The Dashboard
To see the project dashboard simply click on the Dashboard icon shown below that is situated in the top left corner of your web browser:

Project Details
With the release of version 8.0 you can now easily switch directly between the Project Details, Logs, Collaborate and Workflow view in the Dashboard.
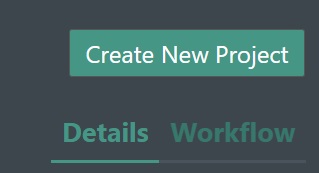
By deafult it will display the project details view.
But you can quickly navigate to Logs, Collaborate, or Workflow view by clicking the selectors as shown above.
Project List
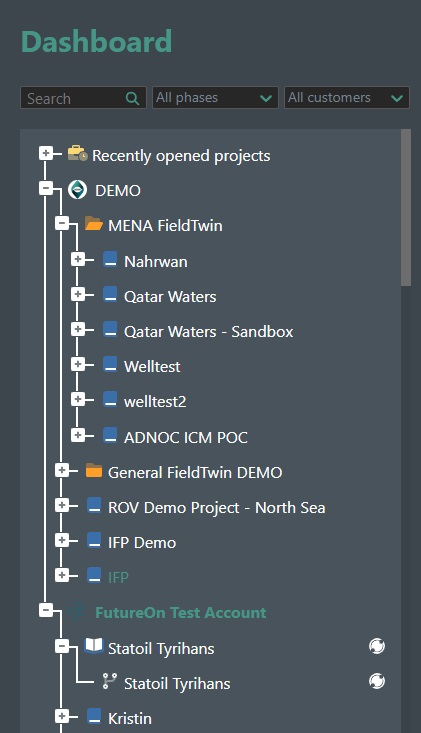
The Treeview on the left will list all project(s) belonging to your company account. Users can filter or search to find the projects or sub projects they are interested in.
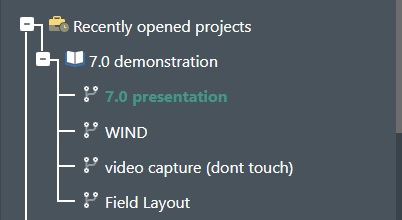
The top part of the tree view will display a folder named Recently opened projects that have been worked on as shown below for quick access:
Project Folders
To help better organize your various project(s) you can Create Folders in the Project List Treeview if you have been assigned the permissions for that, which is controlled by the FieldTwin Admin application. You can have several nested levels of folders as well.
Create Folder
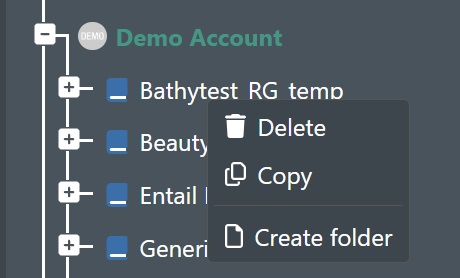
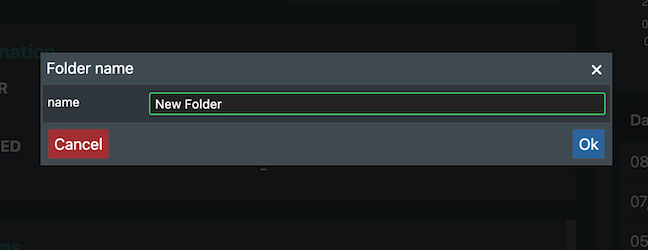
To create a new Folder, simply right click on a tree node and select the Create folder item from the menu:
This will display the following dialog:
The folder will now show up in the treeview
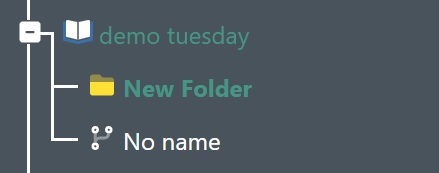
Now just drag and drop the project you want into the folder.
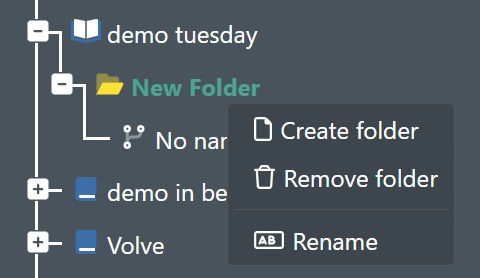
Remove/Rename Folder
Right Click on the created folder to Remove or Rename it:
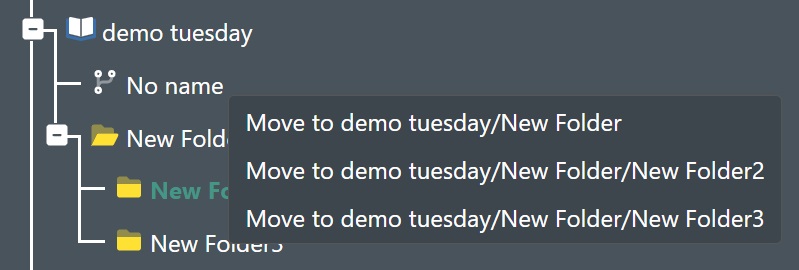
Move To
Right Click on you project in a folder structure to see Move to options so you do not have to drag and drop:
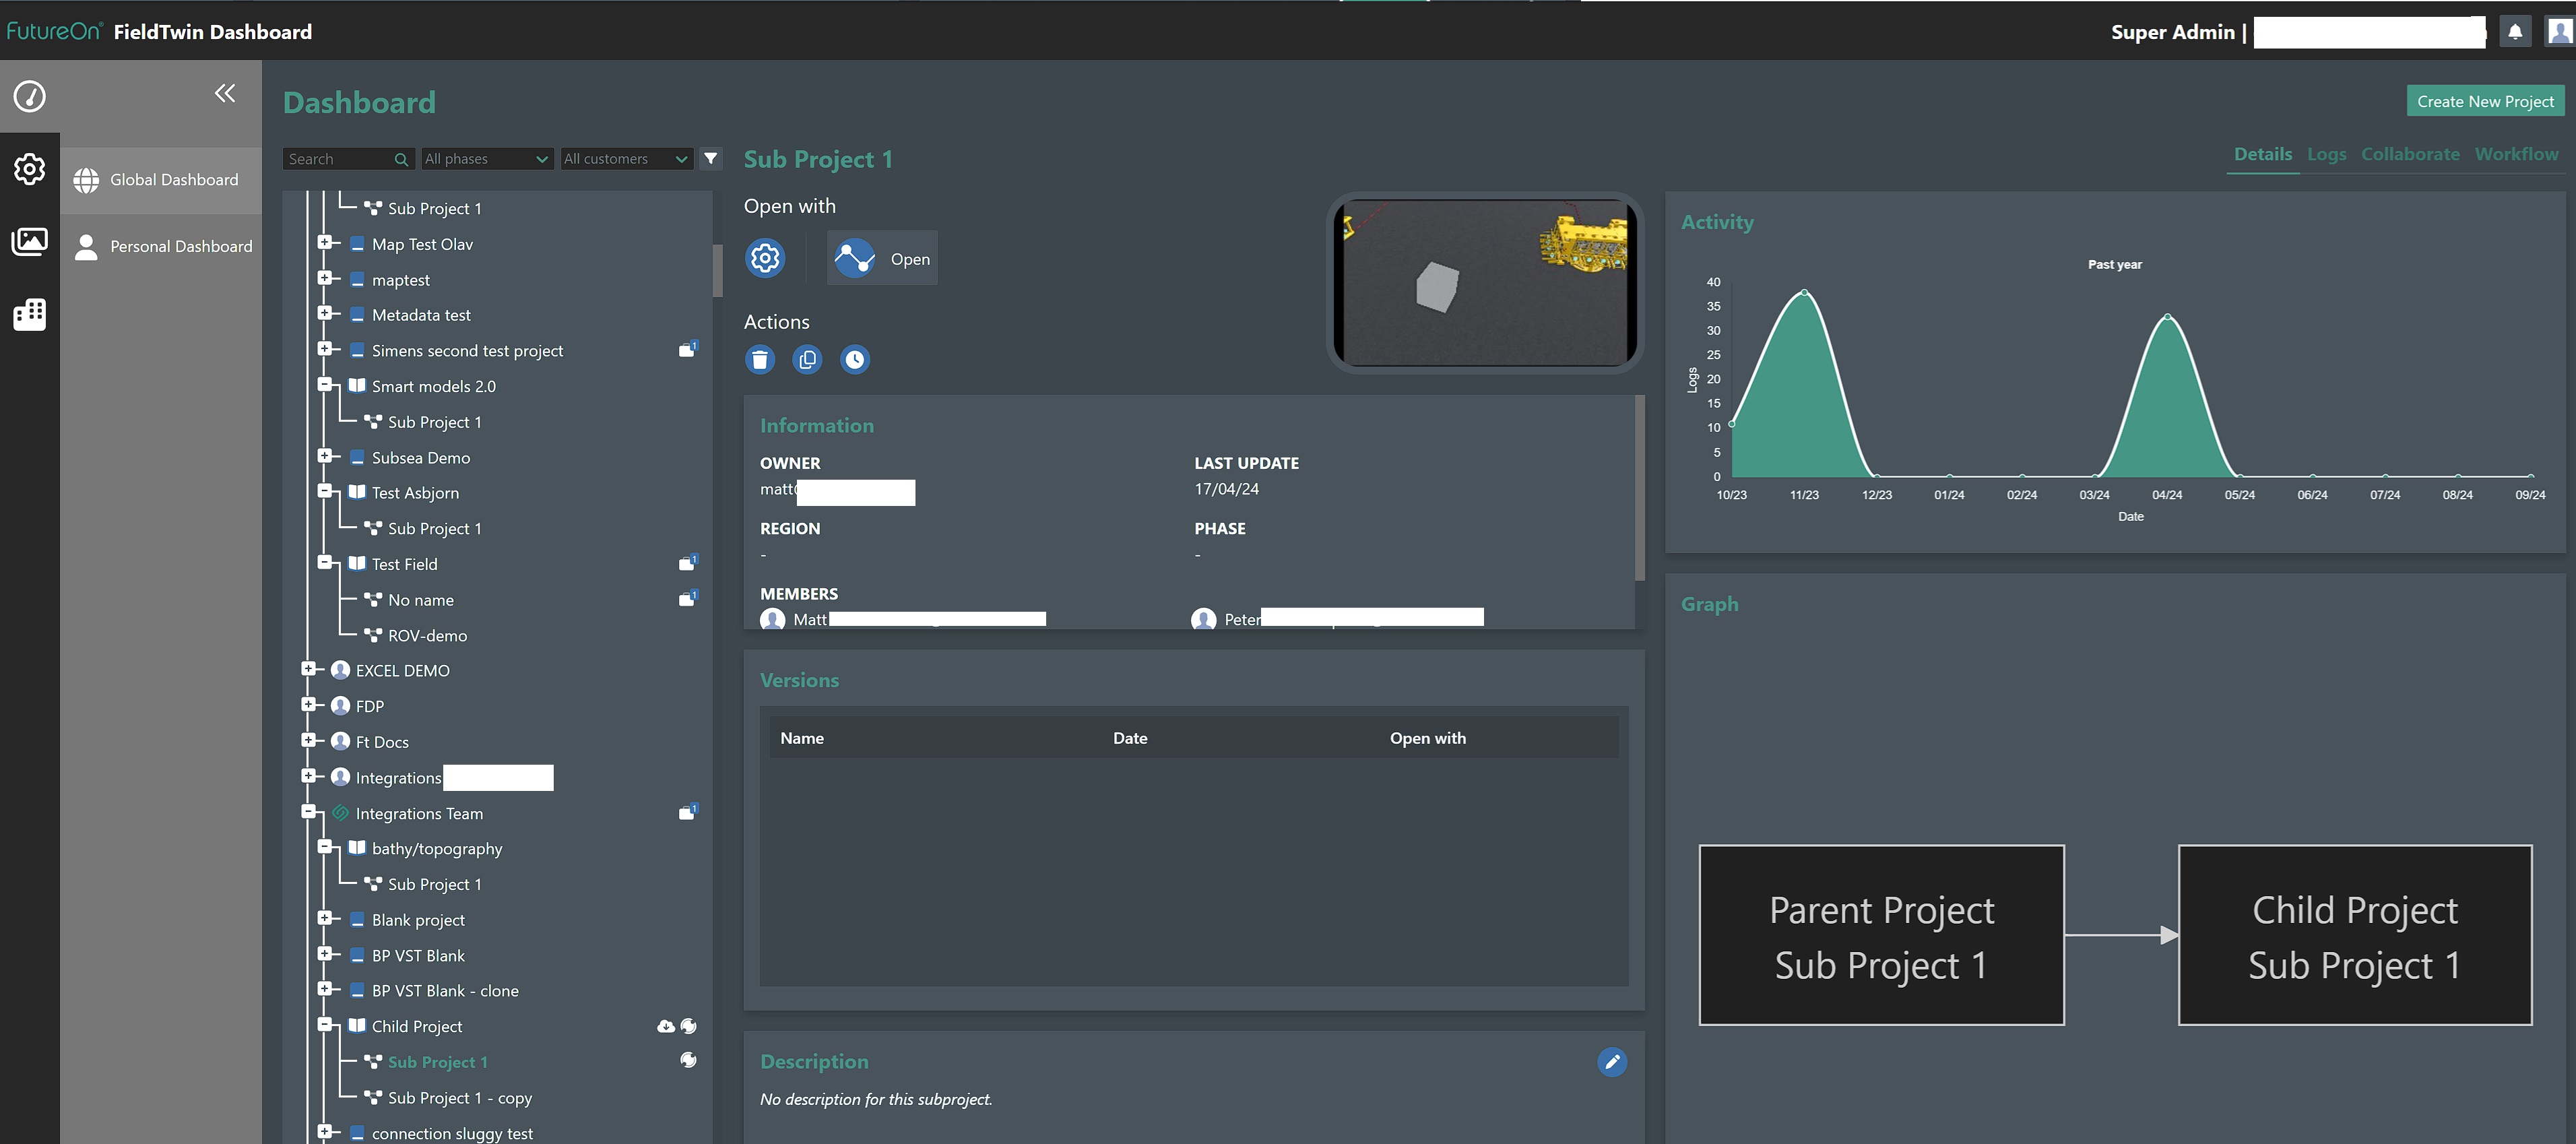
Project Details
The project details will list the project name, and a thumbnail with a snapshot of the layout (This can be set inside the project as the default viewpoint. With other information and how to open the project based on your user license. The user, access project settings etc.
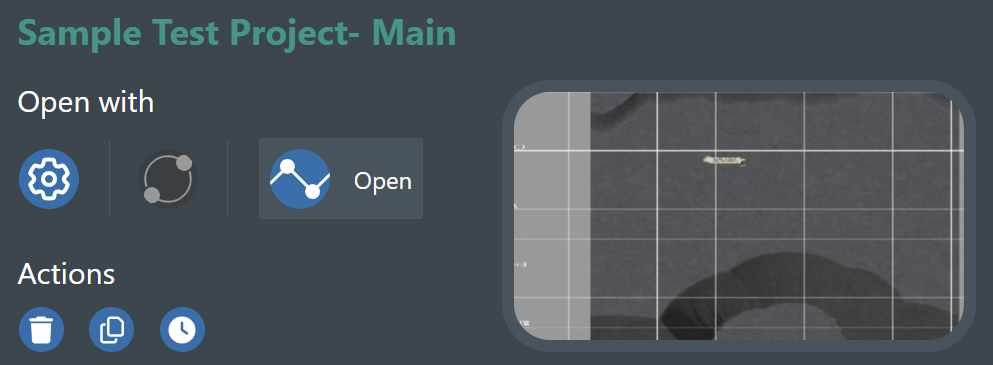
Open With - This will display the settings / applications available for your user license to open the project with e.g. Admin, Pro, Pro Design, View, Collaborate etc.
Actions - This will display the available action icons for the project. The available actions are:
Delete
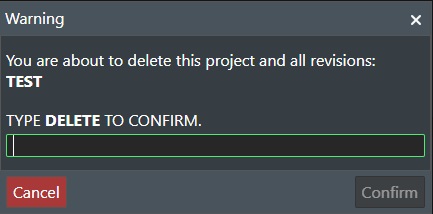
Press the trashcan icon to delete the selected project / sub-project. A confirmation dialog will then be displayed and prompt you to type DELETE and press Confirm to delete the project. Note! This action cannot be undone.
Copy
Press this icon to create a copy of your project. This will display the following dialog box:
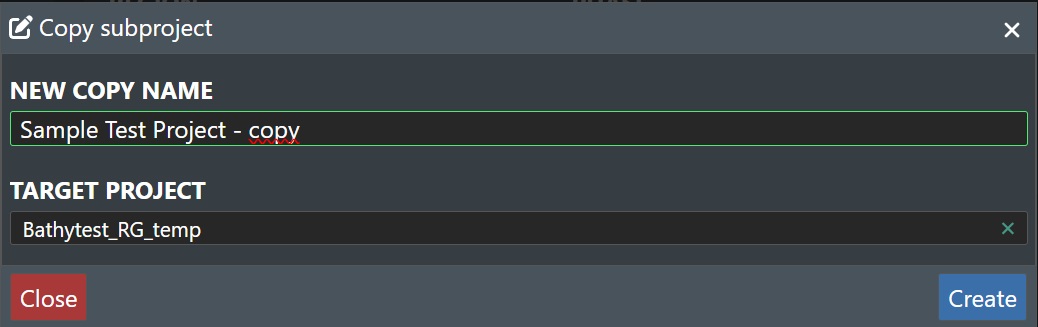
New Copy Name - This will display the default name appended with copy for the project and allow you to edit it before copying.
Press Create to start the copy process, or Cancel to abort.
Move
Press this icon to move the project to another Account if you have more then one. This will display the following dialog box:

Move to account - Select the account to move the project to from the drop down list.
Press Ok to move the project, or **Cancel/Cancel All ** to abort.
Create a version
Press this icon to create a new version of your project. This will display the following dialog box:
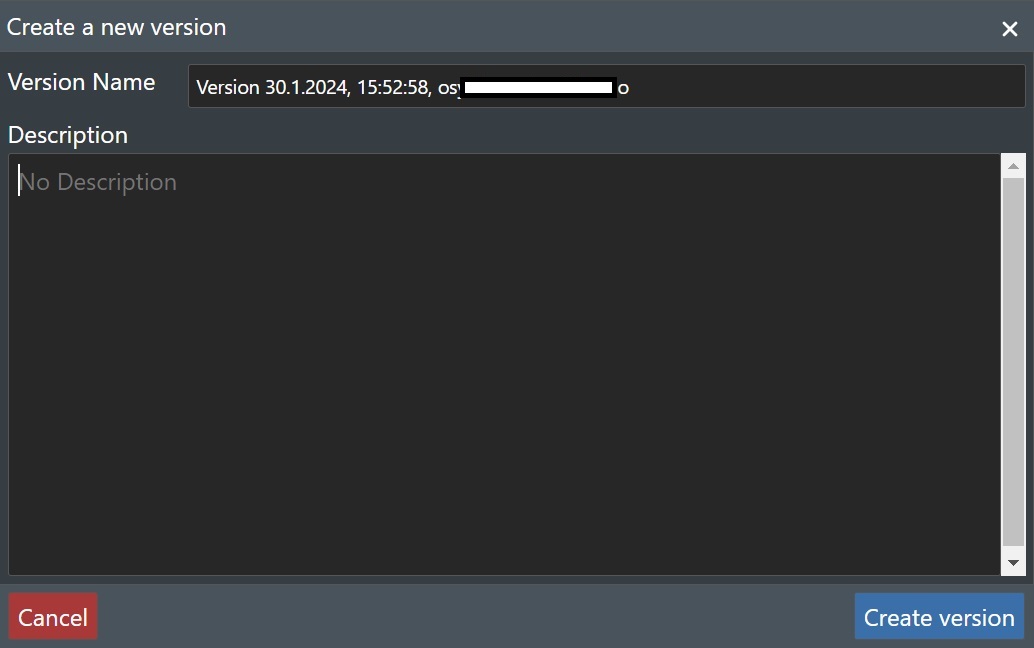
Version Name - This will display the default name for the project with timestamp etc. and allow you to edit it before creating a new version.
Description - This field allows you to add an optioninal description for the new version.
Press Create Version to create it, or Cancel to abort.
Project List
Below the recently open project folder at the top you will see a list of all other projects or project folders for your account or that you are a member of as shown here:
Project Icons
In the project list you may see the following icons used together with the project name:
Is used as a parent project - This icon means that this project is a Parent project.

Has a parent project - This icon means that this project has another project as a Parent.

Is shared in Collaborate - This icon means that this project is shared using FieldTwin Collaborate with another party..

Search / Filter
You can use the the project search & filter option at the top of screen to quickly find the projects you are looking for:
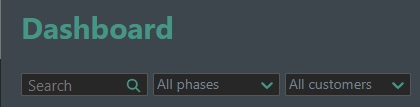
Search - Start typing in this field to filter the project list automatically.
All phases - This will display a drop down list of all phases that are registered in the system e.g. concept, pre-feed, feed etc. And select the phase you want to filter the project list by. You can select multiple phases to filter by.
All customers - Displays a drop down list over the customers that are registered in the system and assigned to a project. Select the customer to filter the project list by that criteria. You can select multiple customers to filter by.
Information
Selecting a project/sub-project in the project list will then display information about the project in this section automatically:
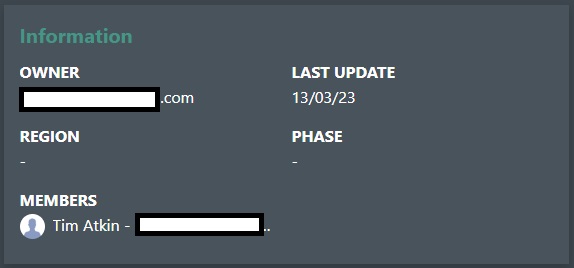
Owner - Displays the email address of the project owner.
Last Update - Displays the date of the last change in the project/sub-project.
Region - Displays the region of the project if it has been defined in the system and a region has been assigned to the project.
Phase - Displays the project phase if it has been defined in the system and a phase has been assigned to the project.
Members - Displays a list of all the project members, along with their email addresses.
Options
If you have selected an Account from the project list then this section with information about the account license is displayed:
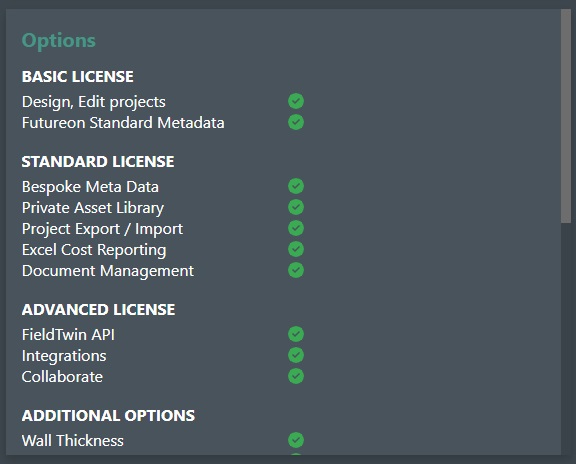
Here all the licensing options are displayed and you will see a green checkmark for those enabled for your current license.
Subprojects Linked
This section displays a list of all sub-projects that are linked to this project as shown below:
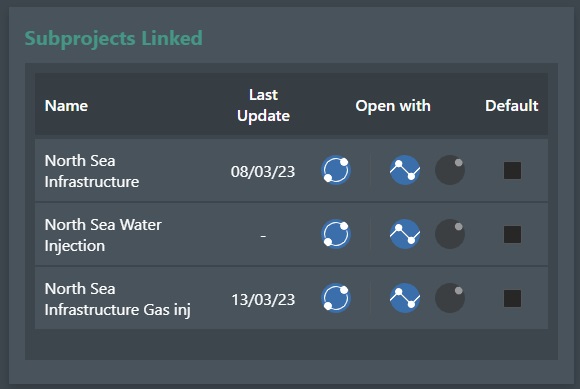
Name - The name of the linked sub-project.
Last Update - The date when the sub-project was last edited.
Open With - Shows the launch icons of the available application you can open the sub-project with depending on your user license.
Default - Allows you to select a default sub-project for this project from the list.
Versions
If you have selected a sub project in the Dashboard then you will see the Versions section as shown below:
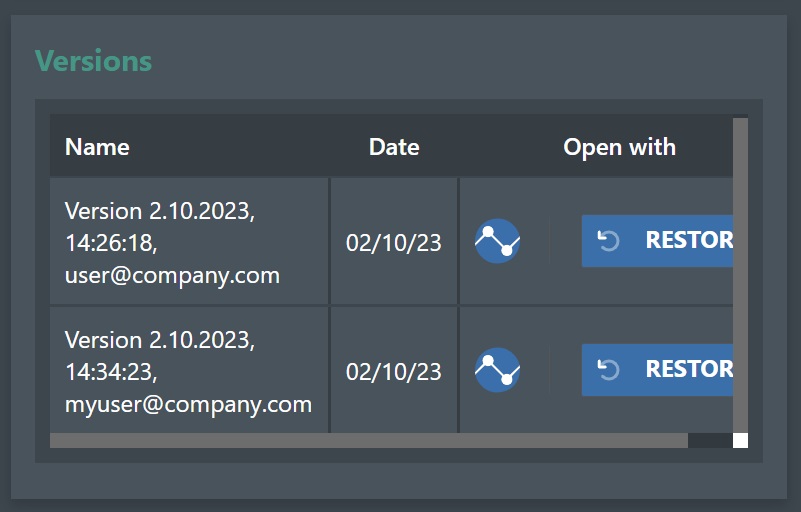
Name - This displays the version name.
Date - The date of the version.
Open With - Shows the launch icons of the available application you can open the sub-project with depending on your user license.
Restore - This allows you to restore the selected version from the list into a new Branch as shown below:

Press Create to restore the version into a new branch or press the Close button to abort.
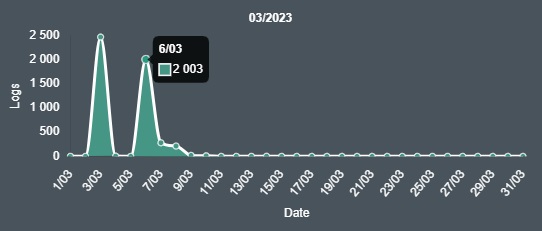
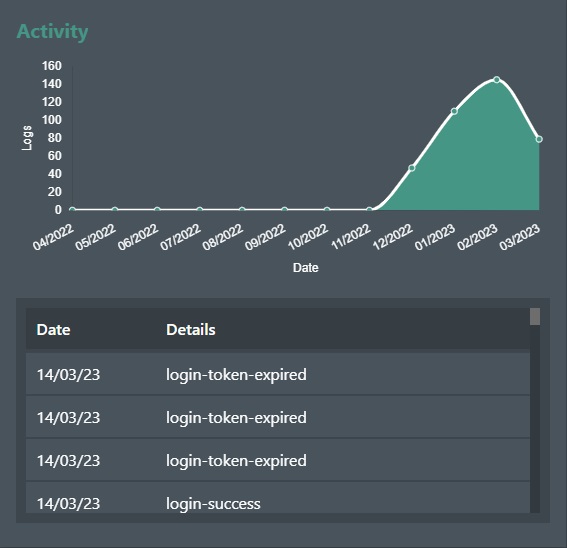
Activity
This section displays an activity graph for the current selected project as shown below:
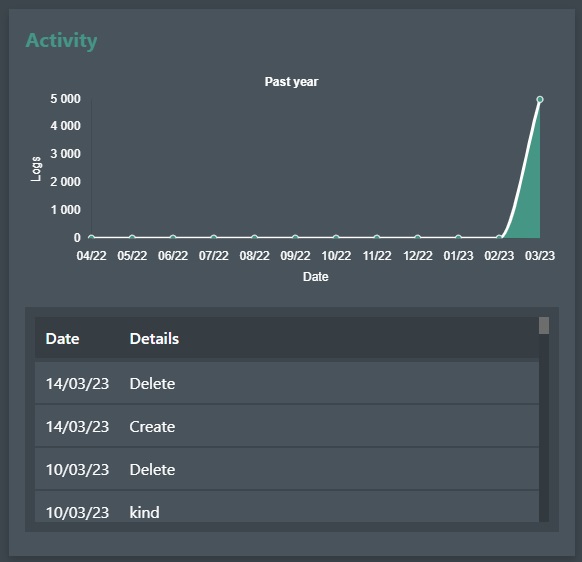
The activity graph is rendered based on number of activity log events by date.
You can also hover over the small green circles for a specific date to see the activity for that date:
If you have selected an Account from the project list then the Activity section will display activity for the account itself as shown here:
Description
This section allows you to enter a description for the project as shown below:
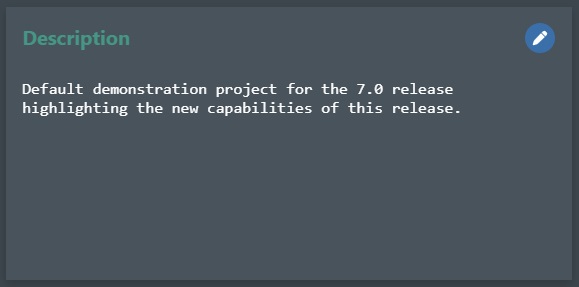
Press the Pencil icon to enter/edit the text description. Press the X icon when done.
Project Graph
If you select a project that is part of a parent <-> child relationship the Dashboard now displays a Visual graph of the relationship as shown below:
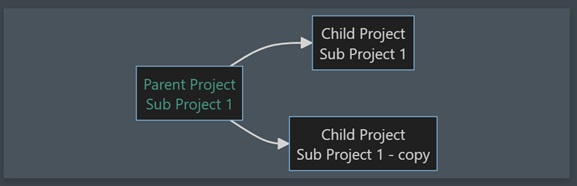
You can also click on any of the Project Names shown in the graph view to change focus to that project in the dashboard.
Logs
To see the project logs select Logs from the Dashboard view selector to change the view:
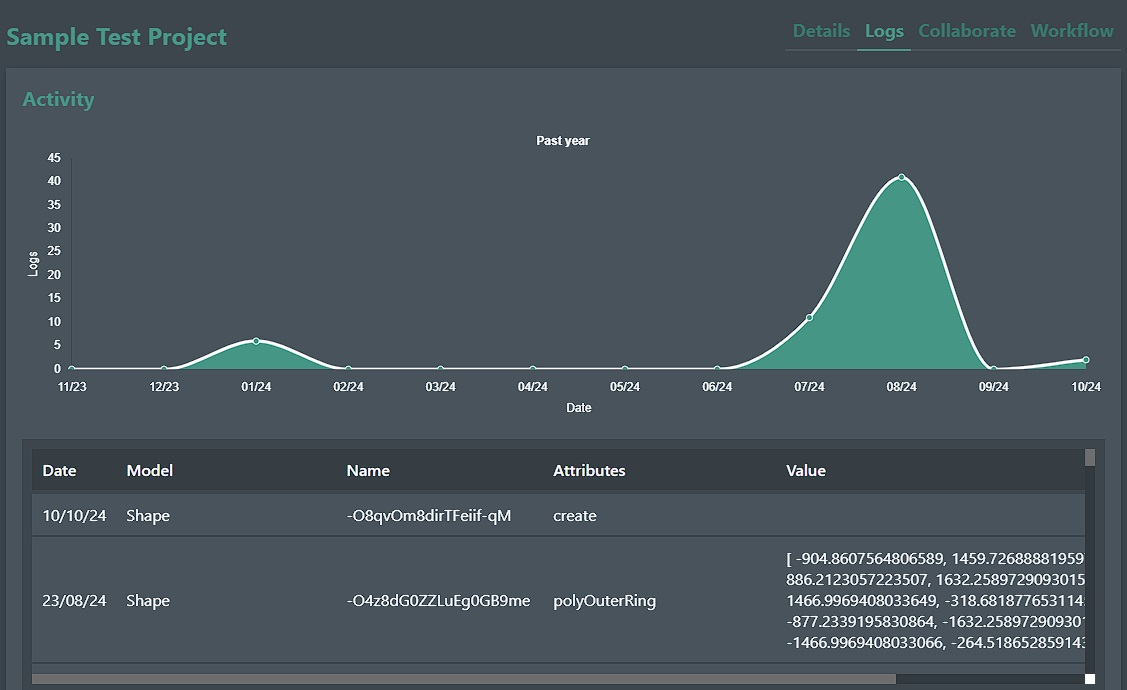
You will then see the project Activity graph, and if you click on any of the green dots on the graph that indicates project activity the logs will then display the logs from that date/time stamp.
Date - This displays the date entry for the activity.
Model - This describes the type of activity and FieldTwin data type that was interacted with or changed.
Name - This shows the unique ID for the data type that was interacted with.
Attributes - Displays the FieldTwin attribute that was changed.
Value - The value of the attribute is displaye here.
You can use the < and > buttons to page through the log pages.
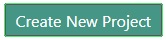
New Project
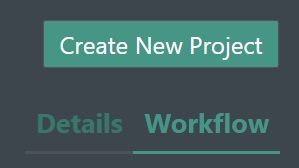
To create a new project simply click on the Create New Project button as shown below:
This will then display the following dialog box:
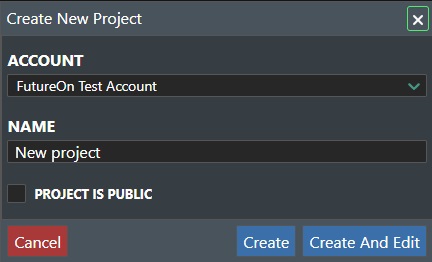
Account - This will display a list of the registered Accounts on the tenant you are on, and allow you to select the account you want to create the project in.
Folders - Select the account folder you want to make the root folder if any.
Name - Enter the name of the new project here.
PROJECT IS PUBLIC - Check this box to make the new project public, which means it will be visible and accessible to all the users in the account. It will ask you to confirm by presenting the following dialog:
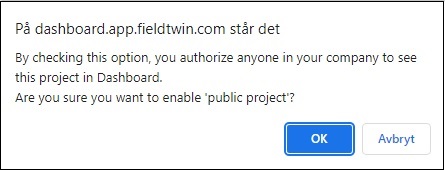
Press OK to continue, or Cancel to abort.
Cancel - Exit back to the Dashboard without creating a project.
Create - This will create the project in the account selected with the given name.
Create And Settings - This will create the project in the account selected with the given name and take you to the Project Settings screen.
Create And Open - This will create the project in the account selected with the given name open the project.
Project Settings
This will display the available Project Settings screen for the newly created or for an existing project:
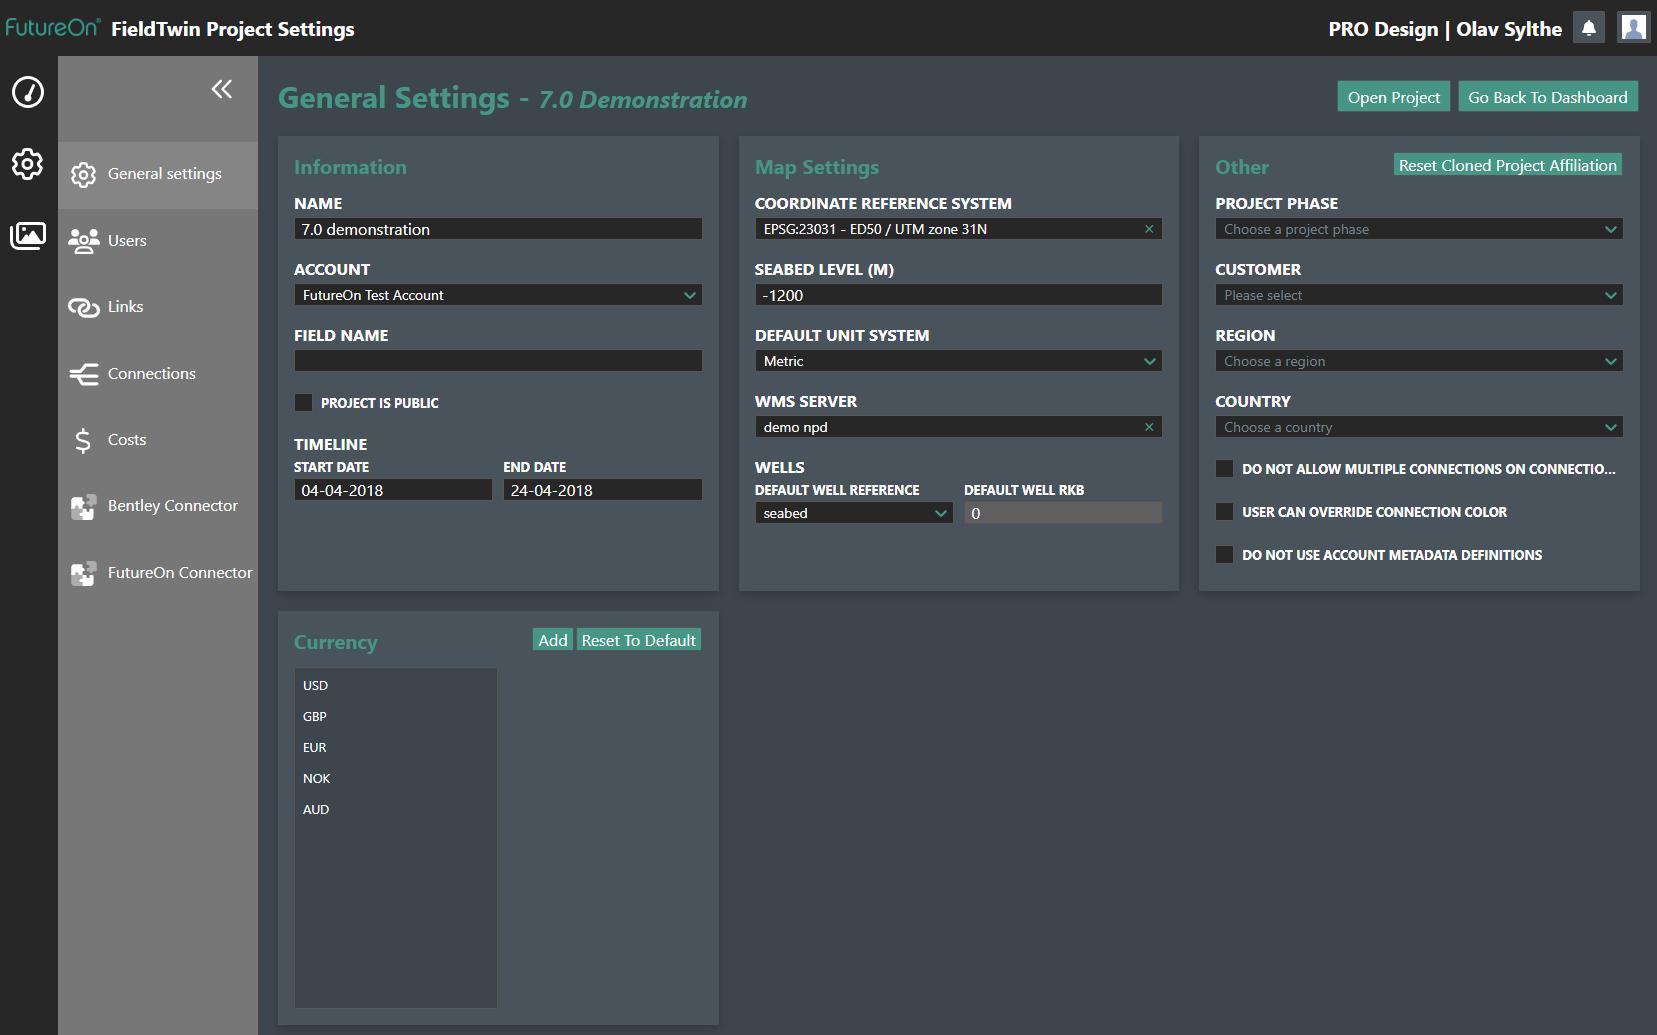
On the left hand side panel you will see the project settings categories namely: General Settings, Users, Links, Connections, and Cost.
General Settings
The screen allows you to specify or edit the various general project settings, and is divided into various sections.
Information
This section displays the general project information:
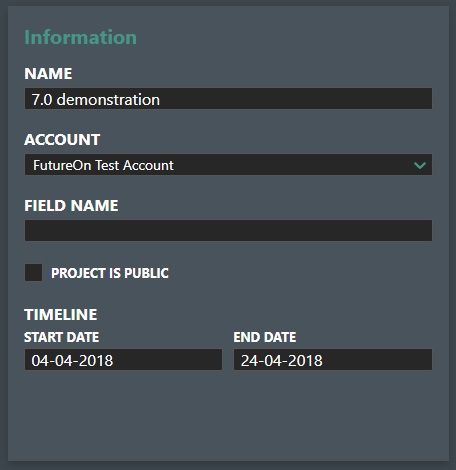
Name - Displayes the name of the new project here, and also allows you to change it.
Account - Shows the account the project is part of. If you are an admin and you have multiple accounts created on your tenant this drop-down list will allow you to select to associate a different account for the project.
Field Name - Optional entry to assign a name of the field.
PROJECT IS PUBLIC - Check this box to make the project public, which means it will be visible and accessible to all the users in the account. It will ask you to confirm by presenting the following dialog:
Public Projects
Public projects are useful if you want to use your project as a project template or reference project for others that they can clone to get started quickly. Eg. you might create a project that might be comprised of Bathymetry, Wells, Reservoir Data etc. that will be used by everyone that will work on field layouts. To make your project public for all users in your account simply check this option. Note! - The project must be saved before this option is available.
Timeline - If desired you can specify a start date and end date for the project. The Start- and End-date fields will present you with a Month-calendar picker for quick and easy date selection.
Map Settings
This section displays the geospatial information for the project:
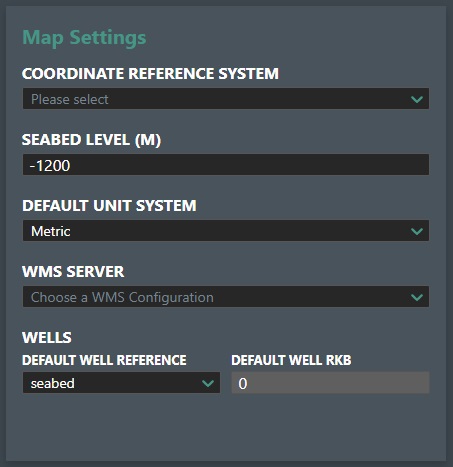
Coordinate Reference System - If you know the CRS for the project you can specify this by selecting it from the drop down menu. Note! If the CRS is for imperial units this will then be used for distance and measurements.
Seabed Level (M) - Enter the default seabed level if you know this. This will be a negative value from the sea level. Note! Uploaded Bathymetry will override this, and the new seabed level for your project will then be the minimum value (Z coordinate) detected from the uploaded bathymetry file(s). Note! Check that the 3D surface Layers property tab shows Use as bathymetry checked if you get incorrect values in your project.
Default Unit System - Select between "Metric", "Field", or "SI" units.
WMS Server - This option allows you to select a mapping service configuration for the project if this has been defined by your system administrator for your account under Account Settings.
For Wells you can specify the following:
Default Well Reference - Select your well reference point for the project from the drop down list. Available settings are; seabed, sea, or rkb.
Default Well RKB - Enter your default RKB(Rotary Kelly Bushing) value here for the project.
Other
This section has a series of optional settings availble as shown here:
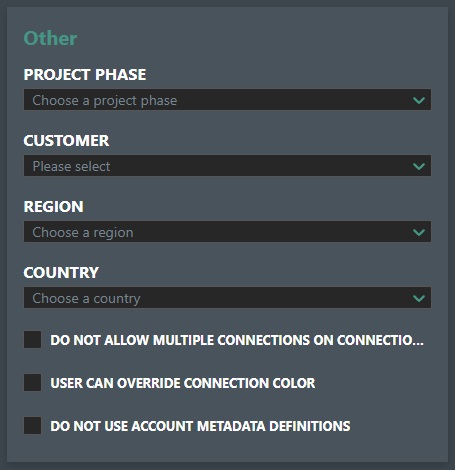
Reset Cloned Project Affiliation - This button will only be displayed if the project is cloned or copied from another project. Pressing this button will remove all links/data to the original project.
Project Phase - If project phases have been defined in the account settings you select this from the drop down list e.g. DG0, or Concepts etc.
Customer - If customer names have been defined in the account settings you select this from the drop down list.
Region - If region names have been defined in the account settings you select this from the drop down list.
Country - Select the country associated with the project from the drop down list.
For private tenants there is a US Embargo exclusion option. If your business is under legal compliance regulations for the “US Embargo” list, please contact us to enable your private instance setting to have the following list of countries excluded from the country listing:
Exclusion List
Crimea, Donetsk and Luhansk regions of Ukraine, Russia Cuba, Korea, Democratic People's Republic of, Syrian Arab Republic, Iran, Islamic Republic of Sudan
Do not allow multiple connections on connection point - This option if checked disallows defined Connectors e.g. Oil Production, Water Injection etc. to have multiple connections on it. If it is not checked you can attach multiple oil production on the same Connector. The universal connector always allows this behaviour. Note! The project must be saved before this option is available.
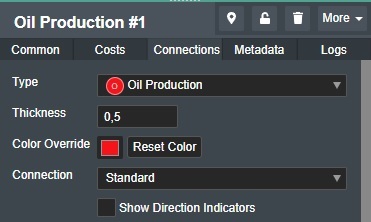
User can override Connection Color - Check this option for this project if you want the users to be able to change the default or defined connection colors for new projects. If checked then this option will show under the Connection Panel when you select a connection as show here as Color Override with a color selector:
Do not use Account MetaData Definitions - If you check this option the project will not load metadata defined on the account level.
Currency
As some projects can involve costs in various currencies based on different vendors, geographic project locations etc. the cost module now allows you to define entering costs for equipment and/or operations in different currencies. To do this you define which currencies you will need and their project defined exchange rate in this section as shown below.
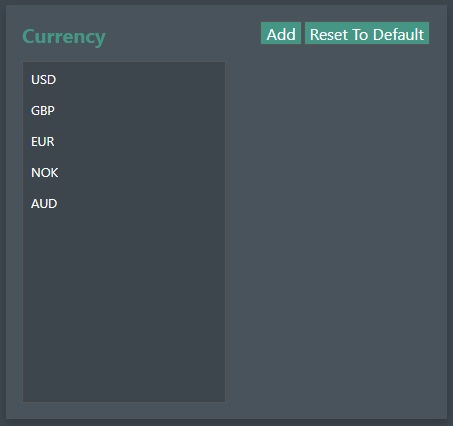
By default the most commonly used currencies are defined by the system, but you can quickly add or edit project specific currencies.
Add - This will create a new line at the bottom of the currency list, where you enter the currency name and exchange rate. You can also delete currencies you do not need, by clicking on the "Trash" icon to the left.
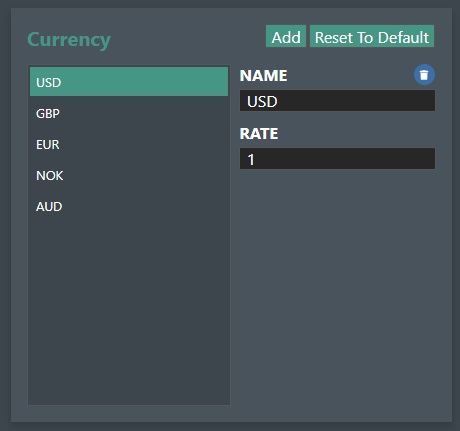
"Rate" - This field is where you enter the currency exchange rate that you wish to use for the project for a specific currency. Note that the selected "Project currency" will have the rate set to a value of "1" as this will be the summation currency used for the project.
Note! If the account settings have defined default currencies and exchange rates then these fields will be populated by the account setting default values.
Reset to Default - Press this button to reset all currency entries to the default account settings. Note! - This operation can't be undone.
Users
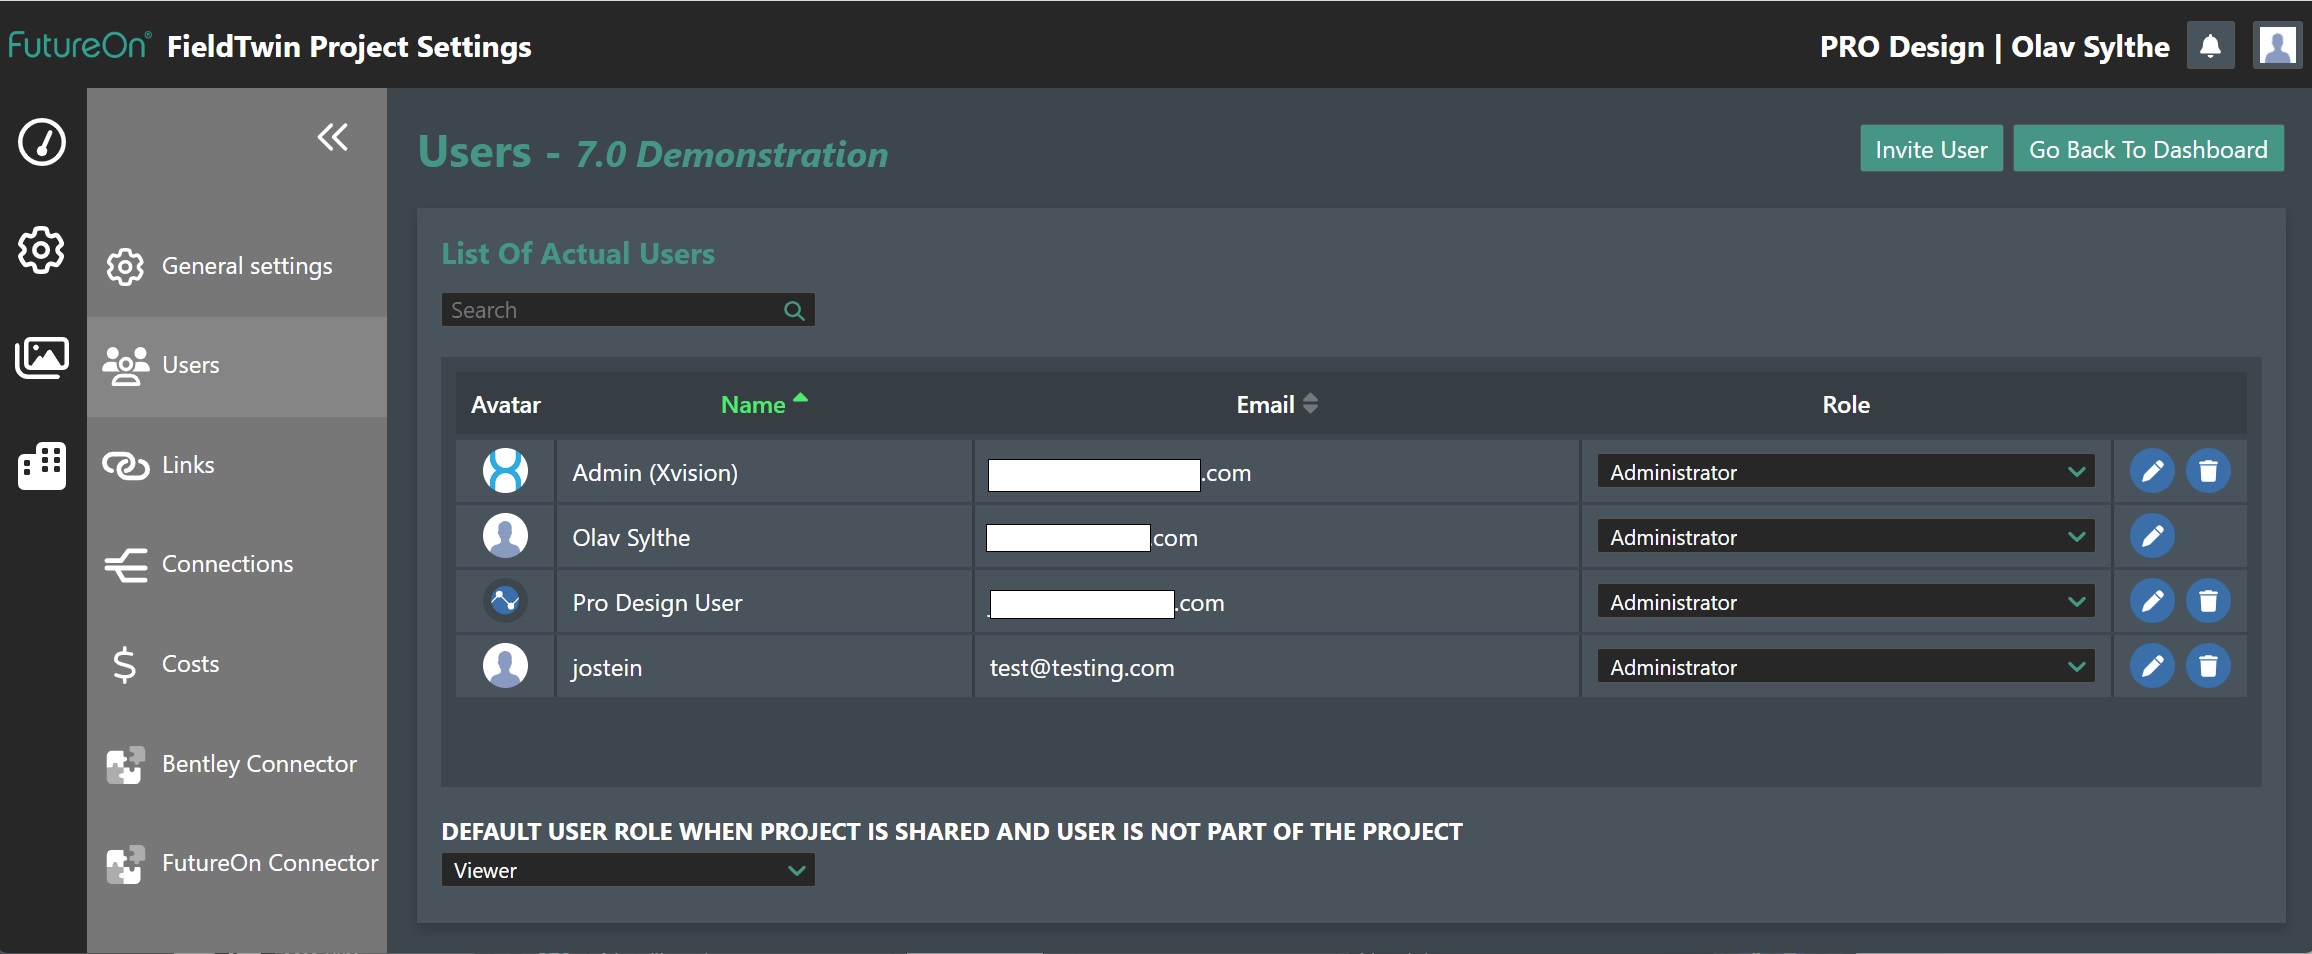
This setting screen displays a table of the users assigned to this project as shown below:
Invite User
This allows you to invite someone into this project.
Click on the Invite User button in the top right hand corner to display the following dialog:
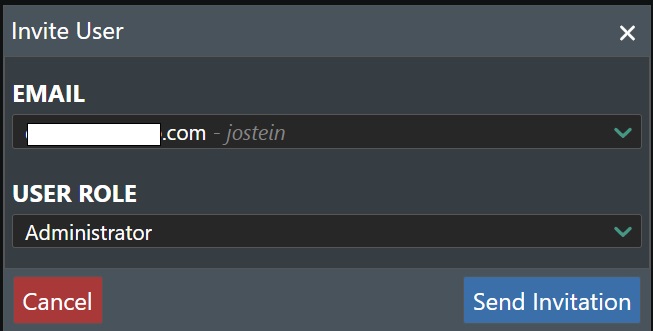
Fill in the following fields to be able to send an email invitation:
Email - Select the email address from the drop down list of users registered in your account.
User Role - Select the user role to be assigned to the user you are inviting from the drop down list. The three (3) default ones are Administrator, Editor, and Viewer. As an Account Adminstrator you can also create new user roles that will be listed here.
Click on Send Invitation to send the user the invitation to this project by email, or vlivk Cancel to abort.
Go back to Dashboard
Click on this button to be returned to the dashboard.

List of Users
You can use the Search field to narrow down the user list as you start typing.
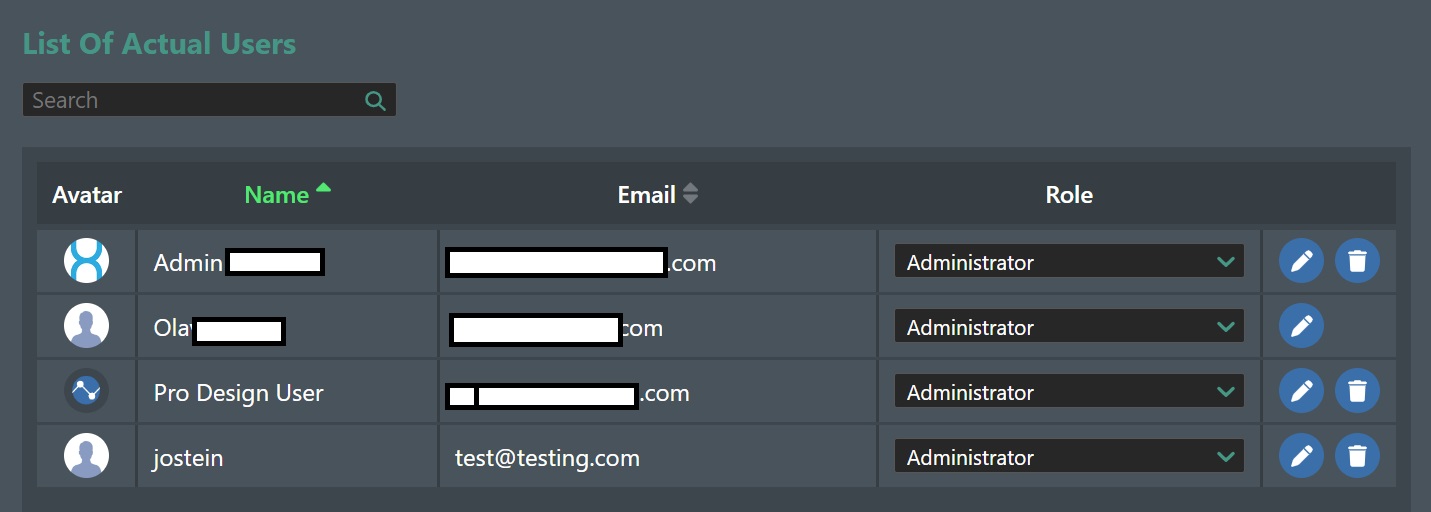
The users table has four (4) columns and clicking on the column header/title will sort the column alphabetically. Clicking again will sort it in reverse order. The users table columns are as follows:
Avatar - This displays the user avatar image if they have uploded one in the user settings.
Name - Displays the user name.
Email - The users email address.
Role - This is the user role assigned to the user. You can change this by using the drop down list. The three (3) default ones are Administrator, Editor, and Viewer. As an Account Adminstrator you can also create new user roles that will be listed here.
The last column shows the available command icons for each user listing:
Edit User
Click on the Pencil Icon to display the Edit User dialog box:
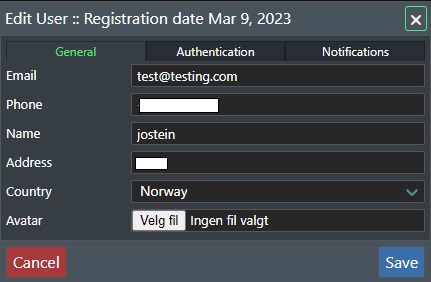
See Edit User Profile for more information.
Delete User
Click on the Trashcan Icon to ddelete this user. This will display the following dialog box for confirmation:
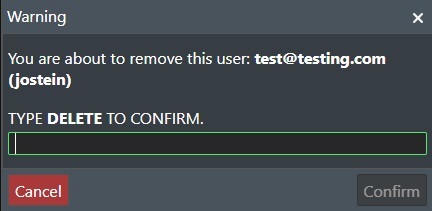
Type in DELETE in the text field and press Confirm and the user will be deleted. Press Cancel to abort. Note! This action cannot be undone.
Default User Role
The Default User Role when project is shared and the user is not part of the project drop down list allows you to assign a default role for people that will get a share link and are not part of the project. Typically this would be Viewer meaning the user can only view the project.
Links
The Links screen displays all linked projects for the current project e.g. Local Parent Subprojects, External Parent Subprojects, Local Child Projects, and Active Sharing of subprojects. And you can use Add Link to link in Local Parent Subprojects and External Parent Subprojects to your current project.
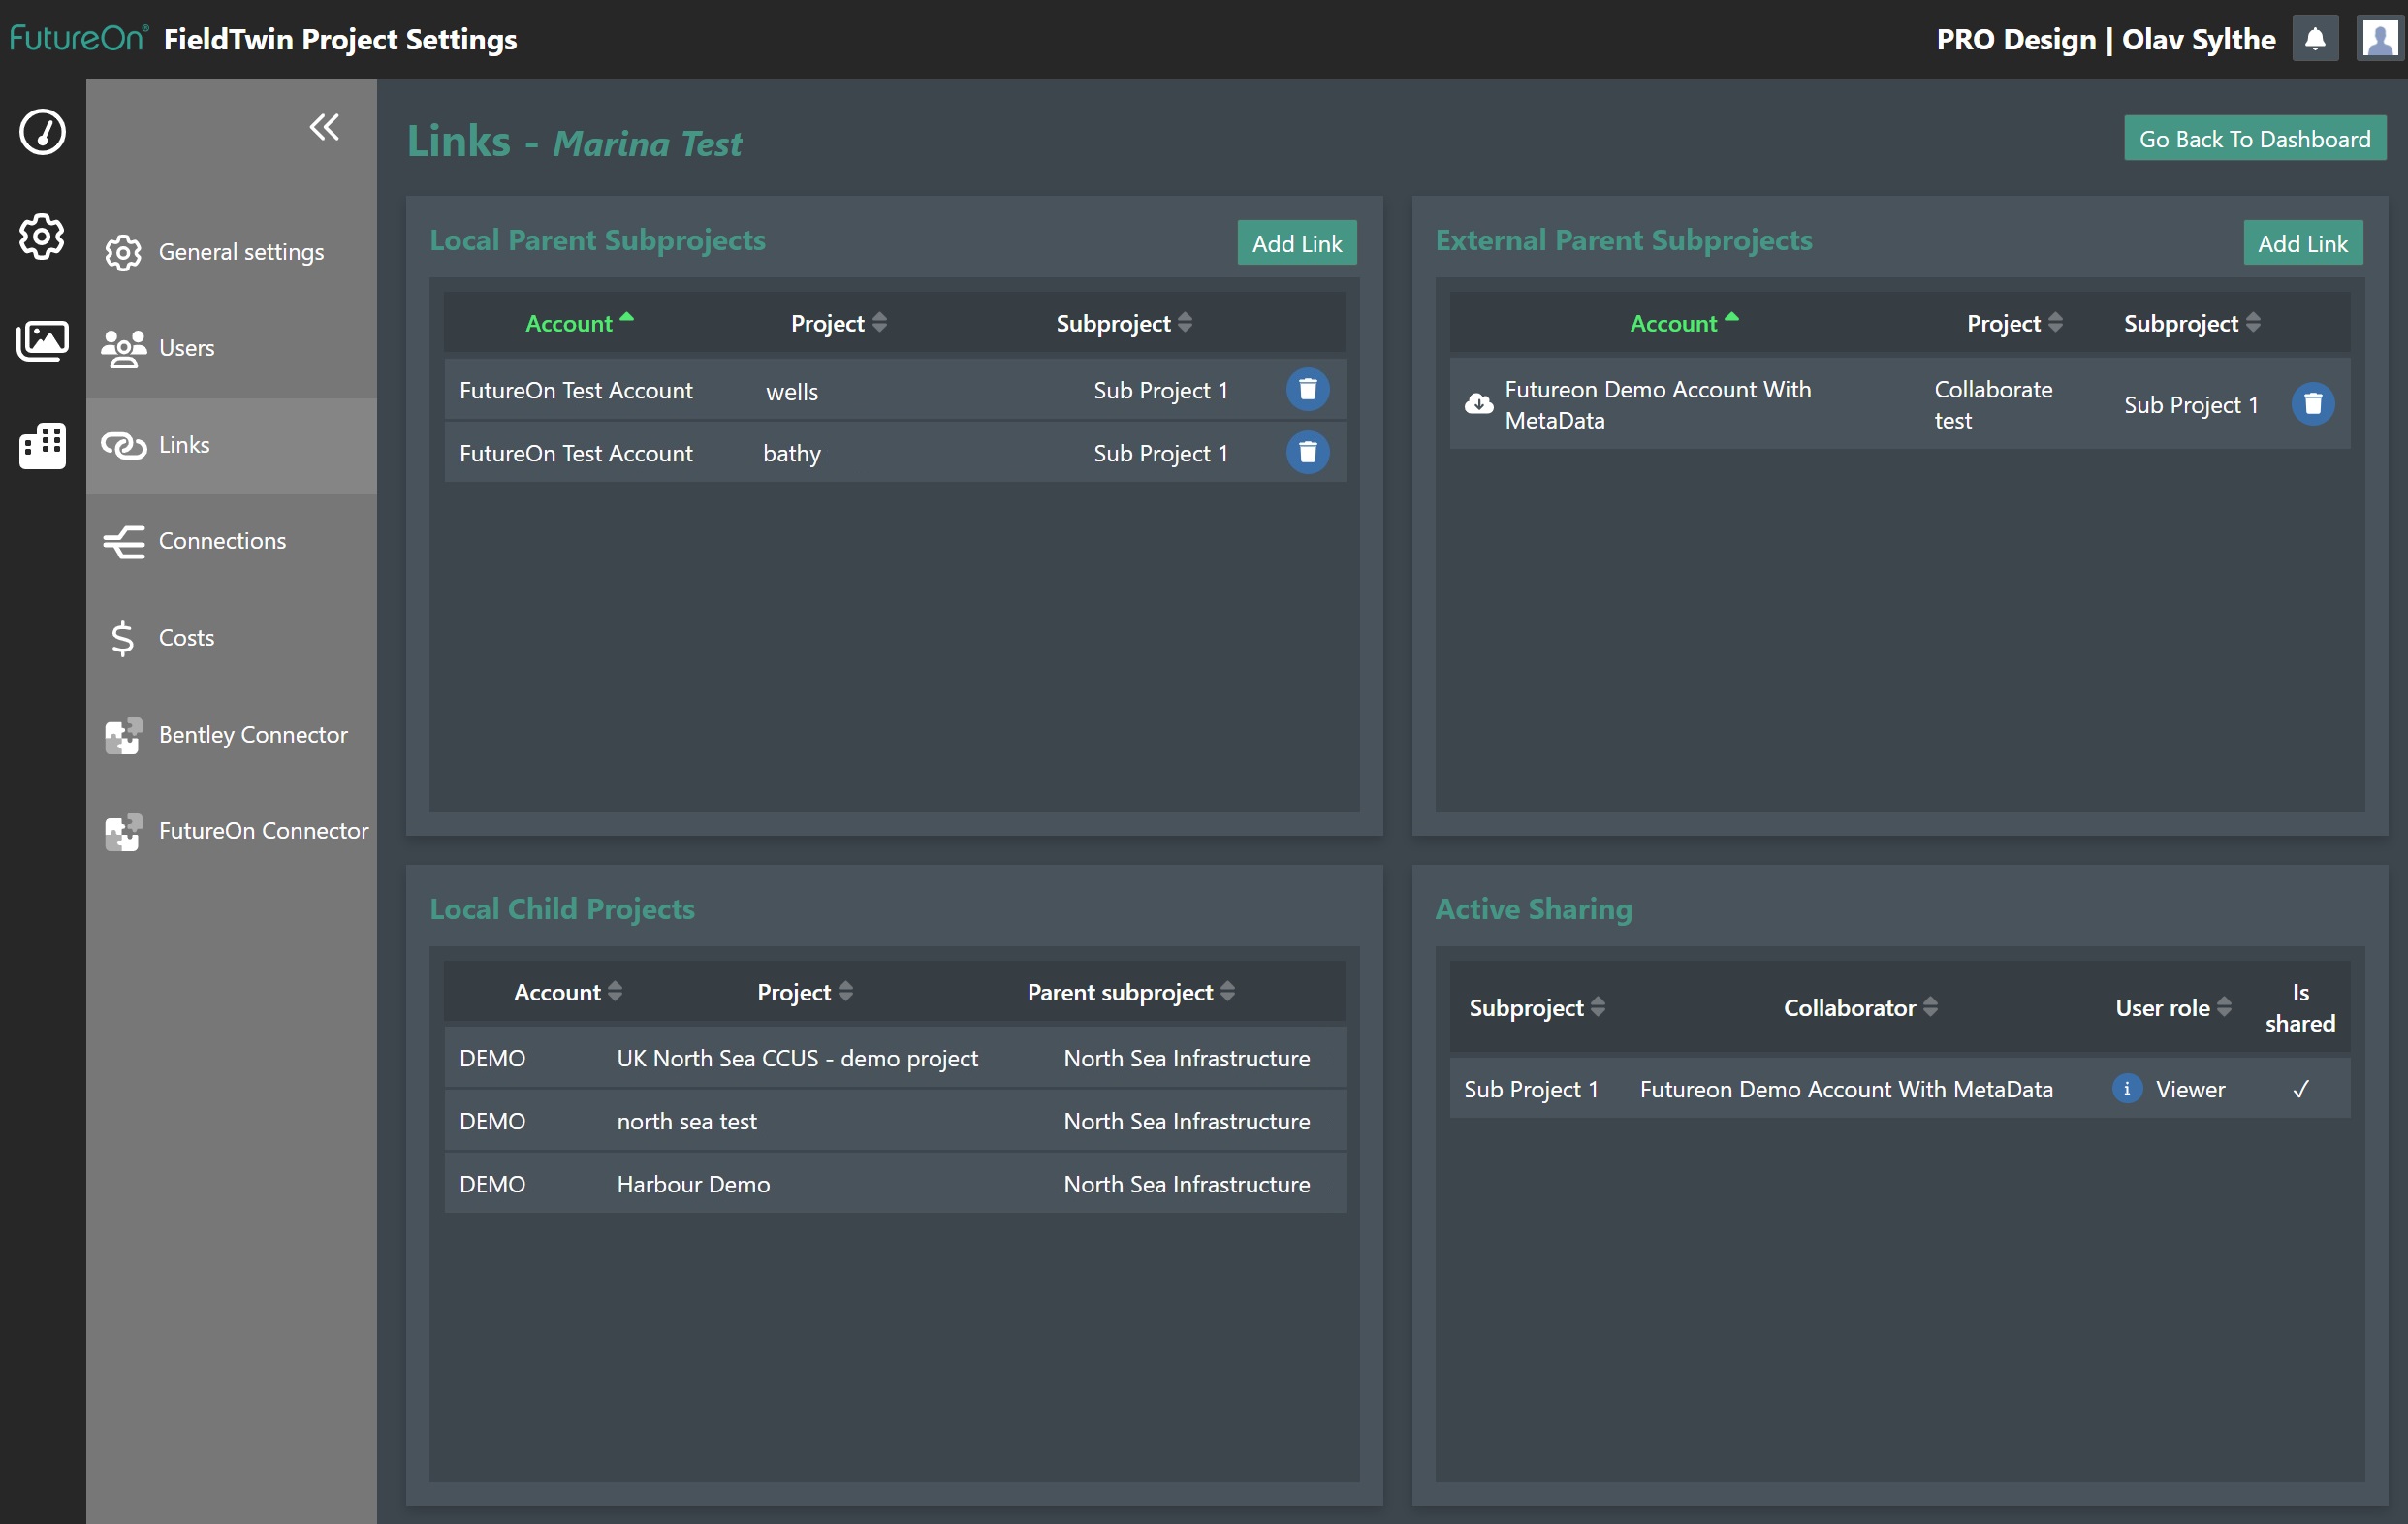
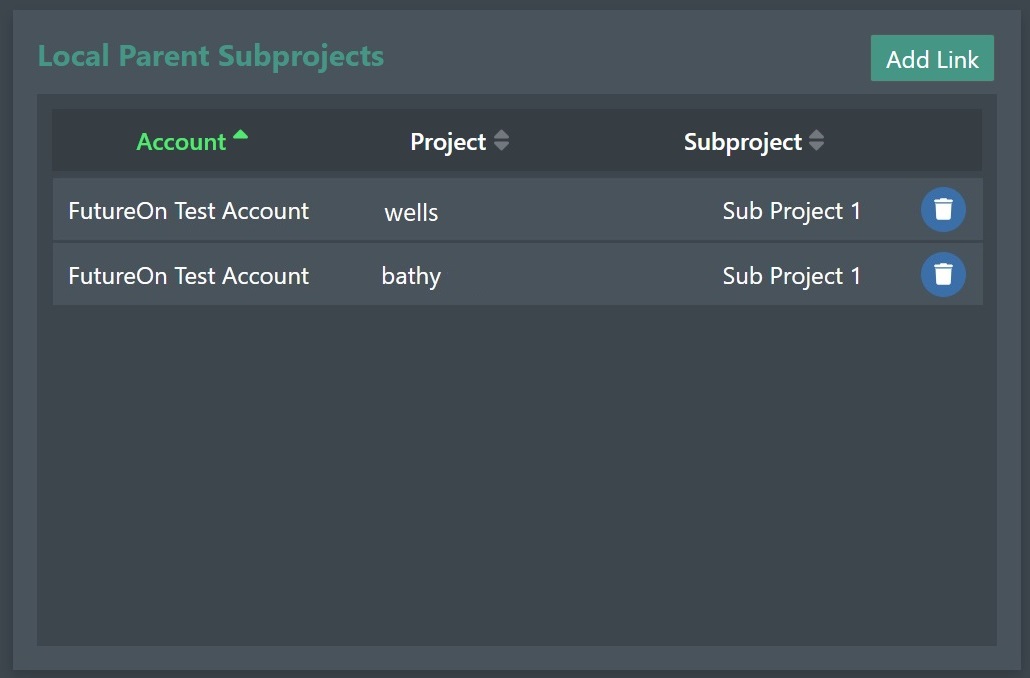
Local Parent Subprojects
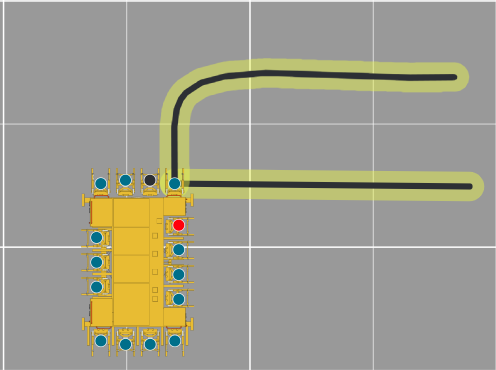
This feature allows you to link different sub projects together into a Parent project. This is very useful at it allows you to create a sub project that only includes as an example: bathymetry and reservoir data. Then in another sub-project you may have all the well bore trajectories. Then by linking these projects into your parent project you can focus on the field design and layout. If the sub-project with bathymetry/reservoir data gets updated with more or better bathymetry then your project is updated automatically. Furthermore, by using FieldTwin User Roles and Project Permissions you can easily control who can upload, modify and/or remove 3D Surfaces, and only allow the projects to be linked into other projects. See the illustration below for an example:
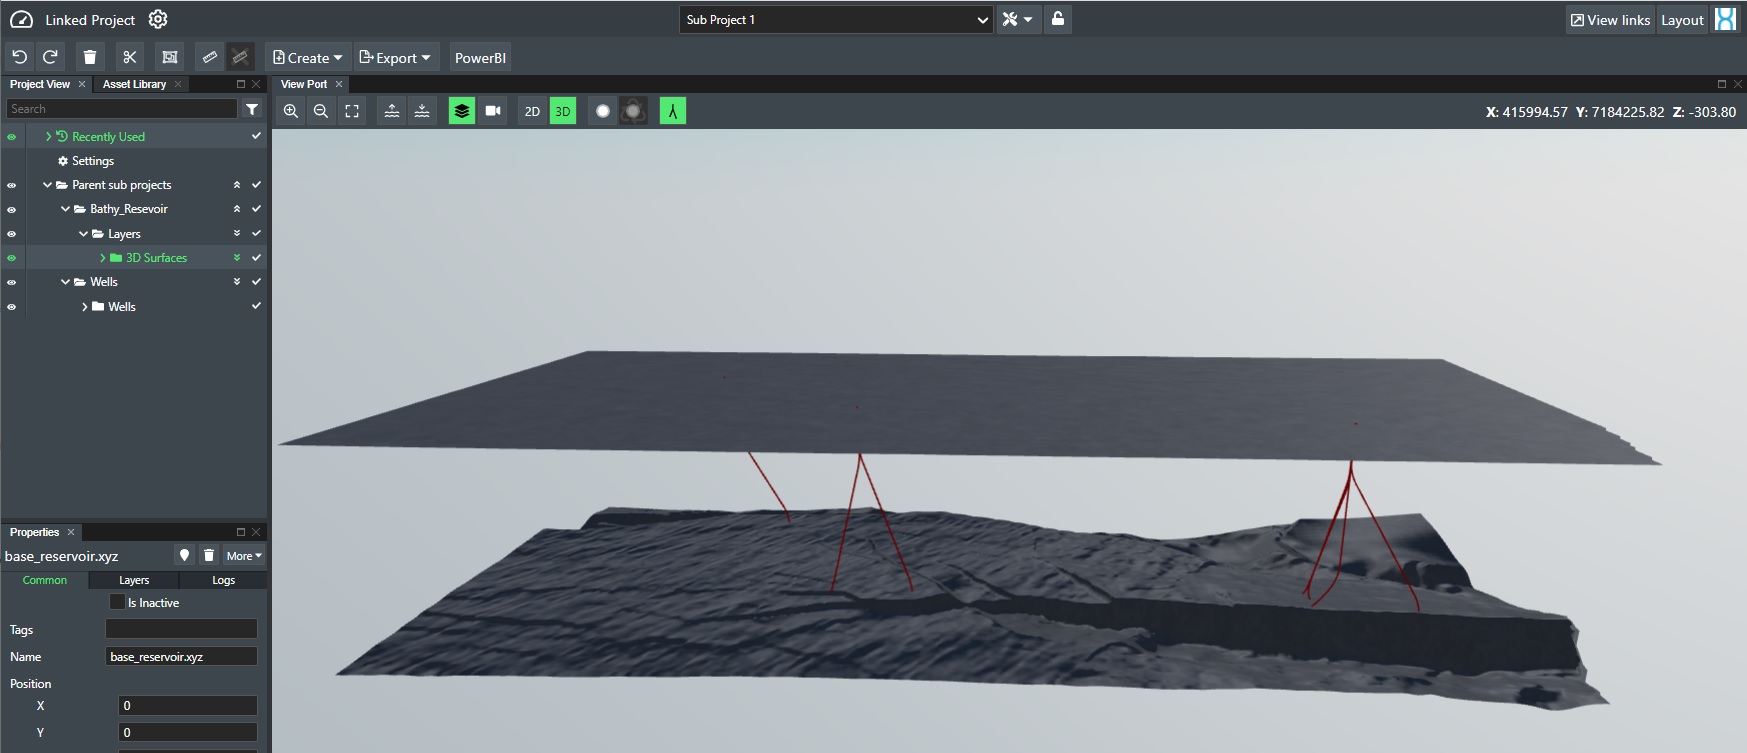
The project above has two (2) linked sub-projects namely "bathy", which contains the bathymetry and reservoir data only, and "wells" that contains the well trajectory data only.
Add Link - Click this button to link sub projects into your parent project. This will display the following dialog:
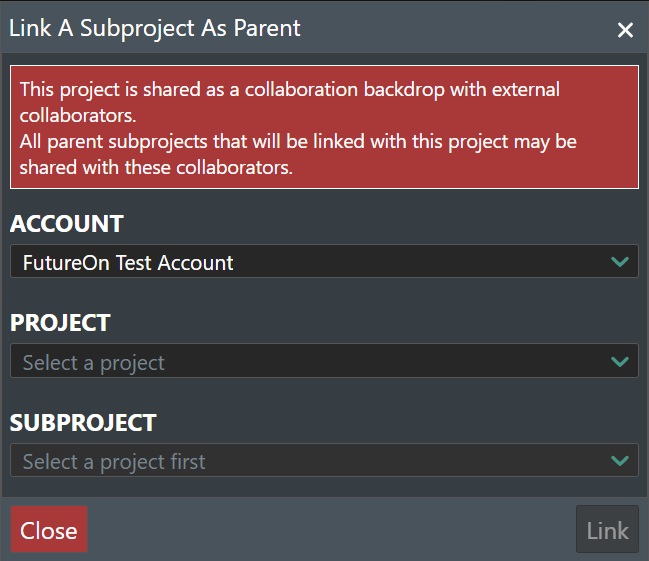
Account - Select the account from the list of accounts you have permission to access from.
Project - Select the project you will link a subproject from.
Subproject - Finally select the subproject from the list to link into this project.
Collaborate Warning
In the dialog above this project is also shared in a FieldTwin Collaborate session on a different tenant and therefore the warning is presented so you do accidentally share a project without meaning to.
Trashcan - Press the trashcan icon to deleted the link.
Local Child Projects
This section displays a list of the local child projects that are linked into the current project if any:
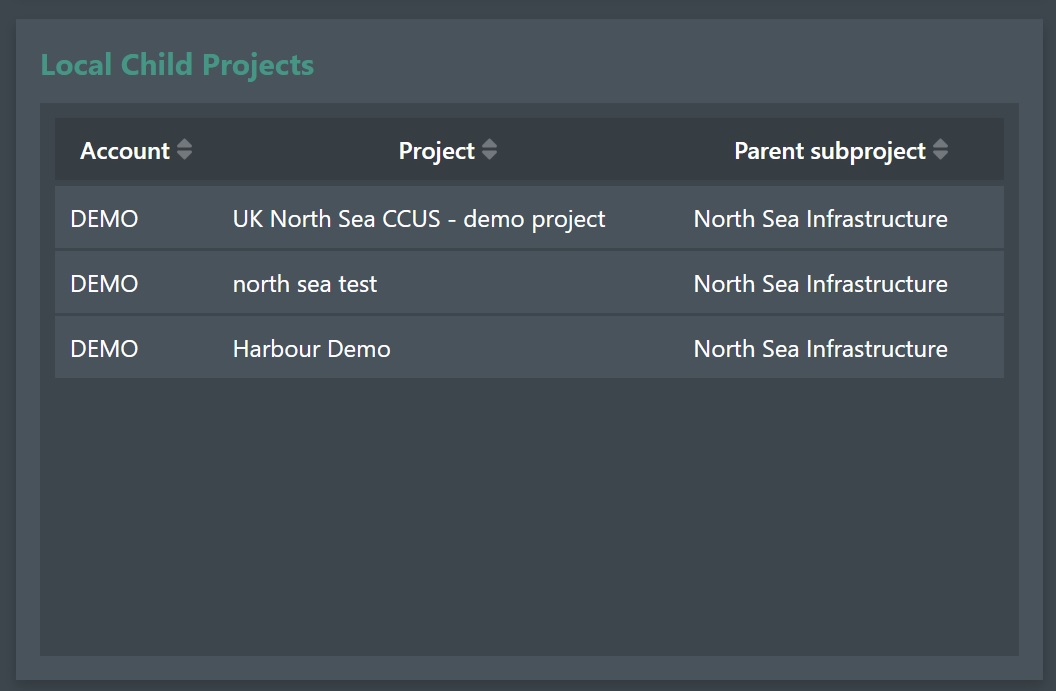
It displays the Account, Project and Parent subproject it is linked in from.
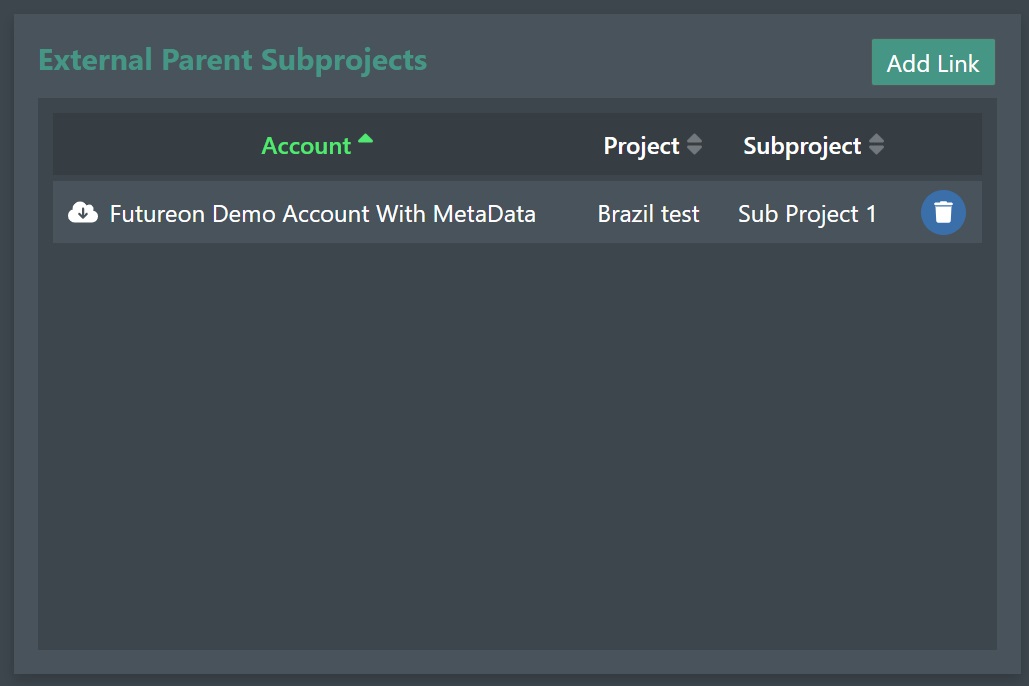
External Parent Subproject
If you have a FieldTwin Collaborate license this will display a list of external parent sub projects. For information about this, please see the documentation for FieldTwin Collaborate
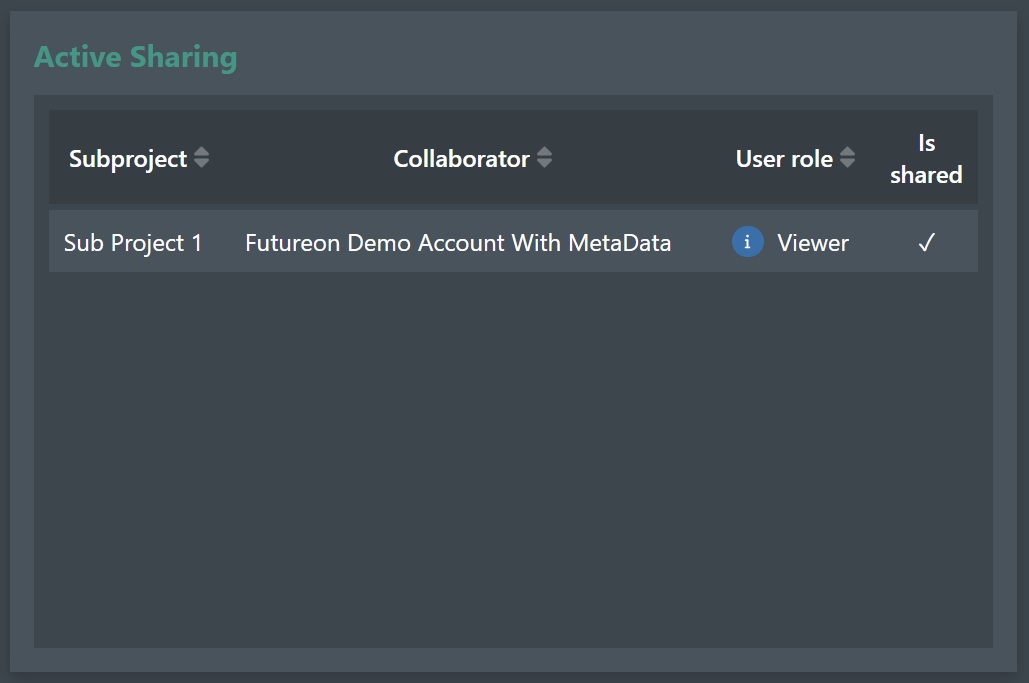
Active Sharing
If you have a FieldTwin Collaborate license this will display a list of the current projects that are shared with another FieldTwin Collaborate Tenant. For information about this, please see the documentation for FieldTwin Collaborate
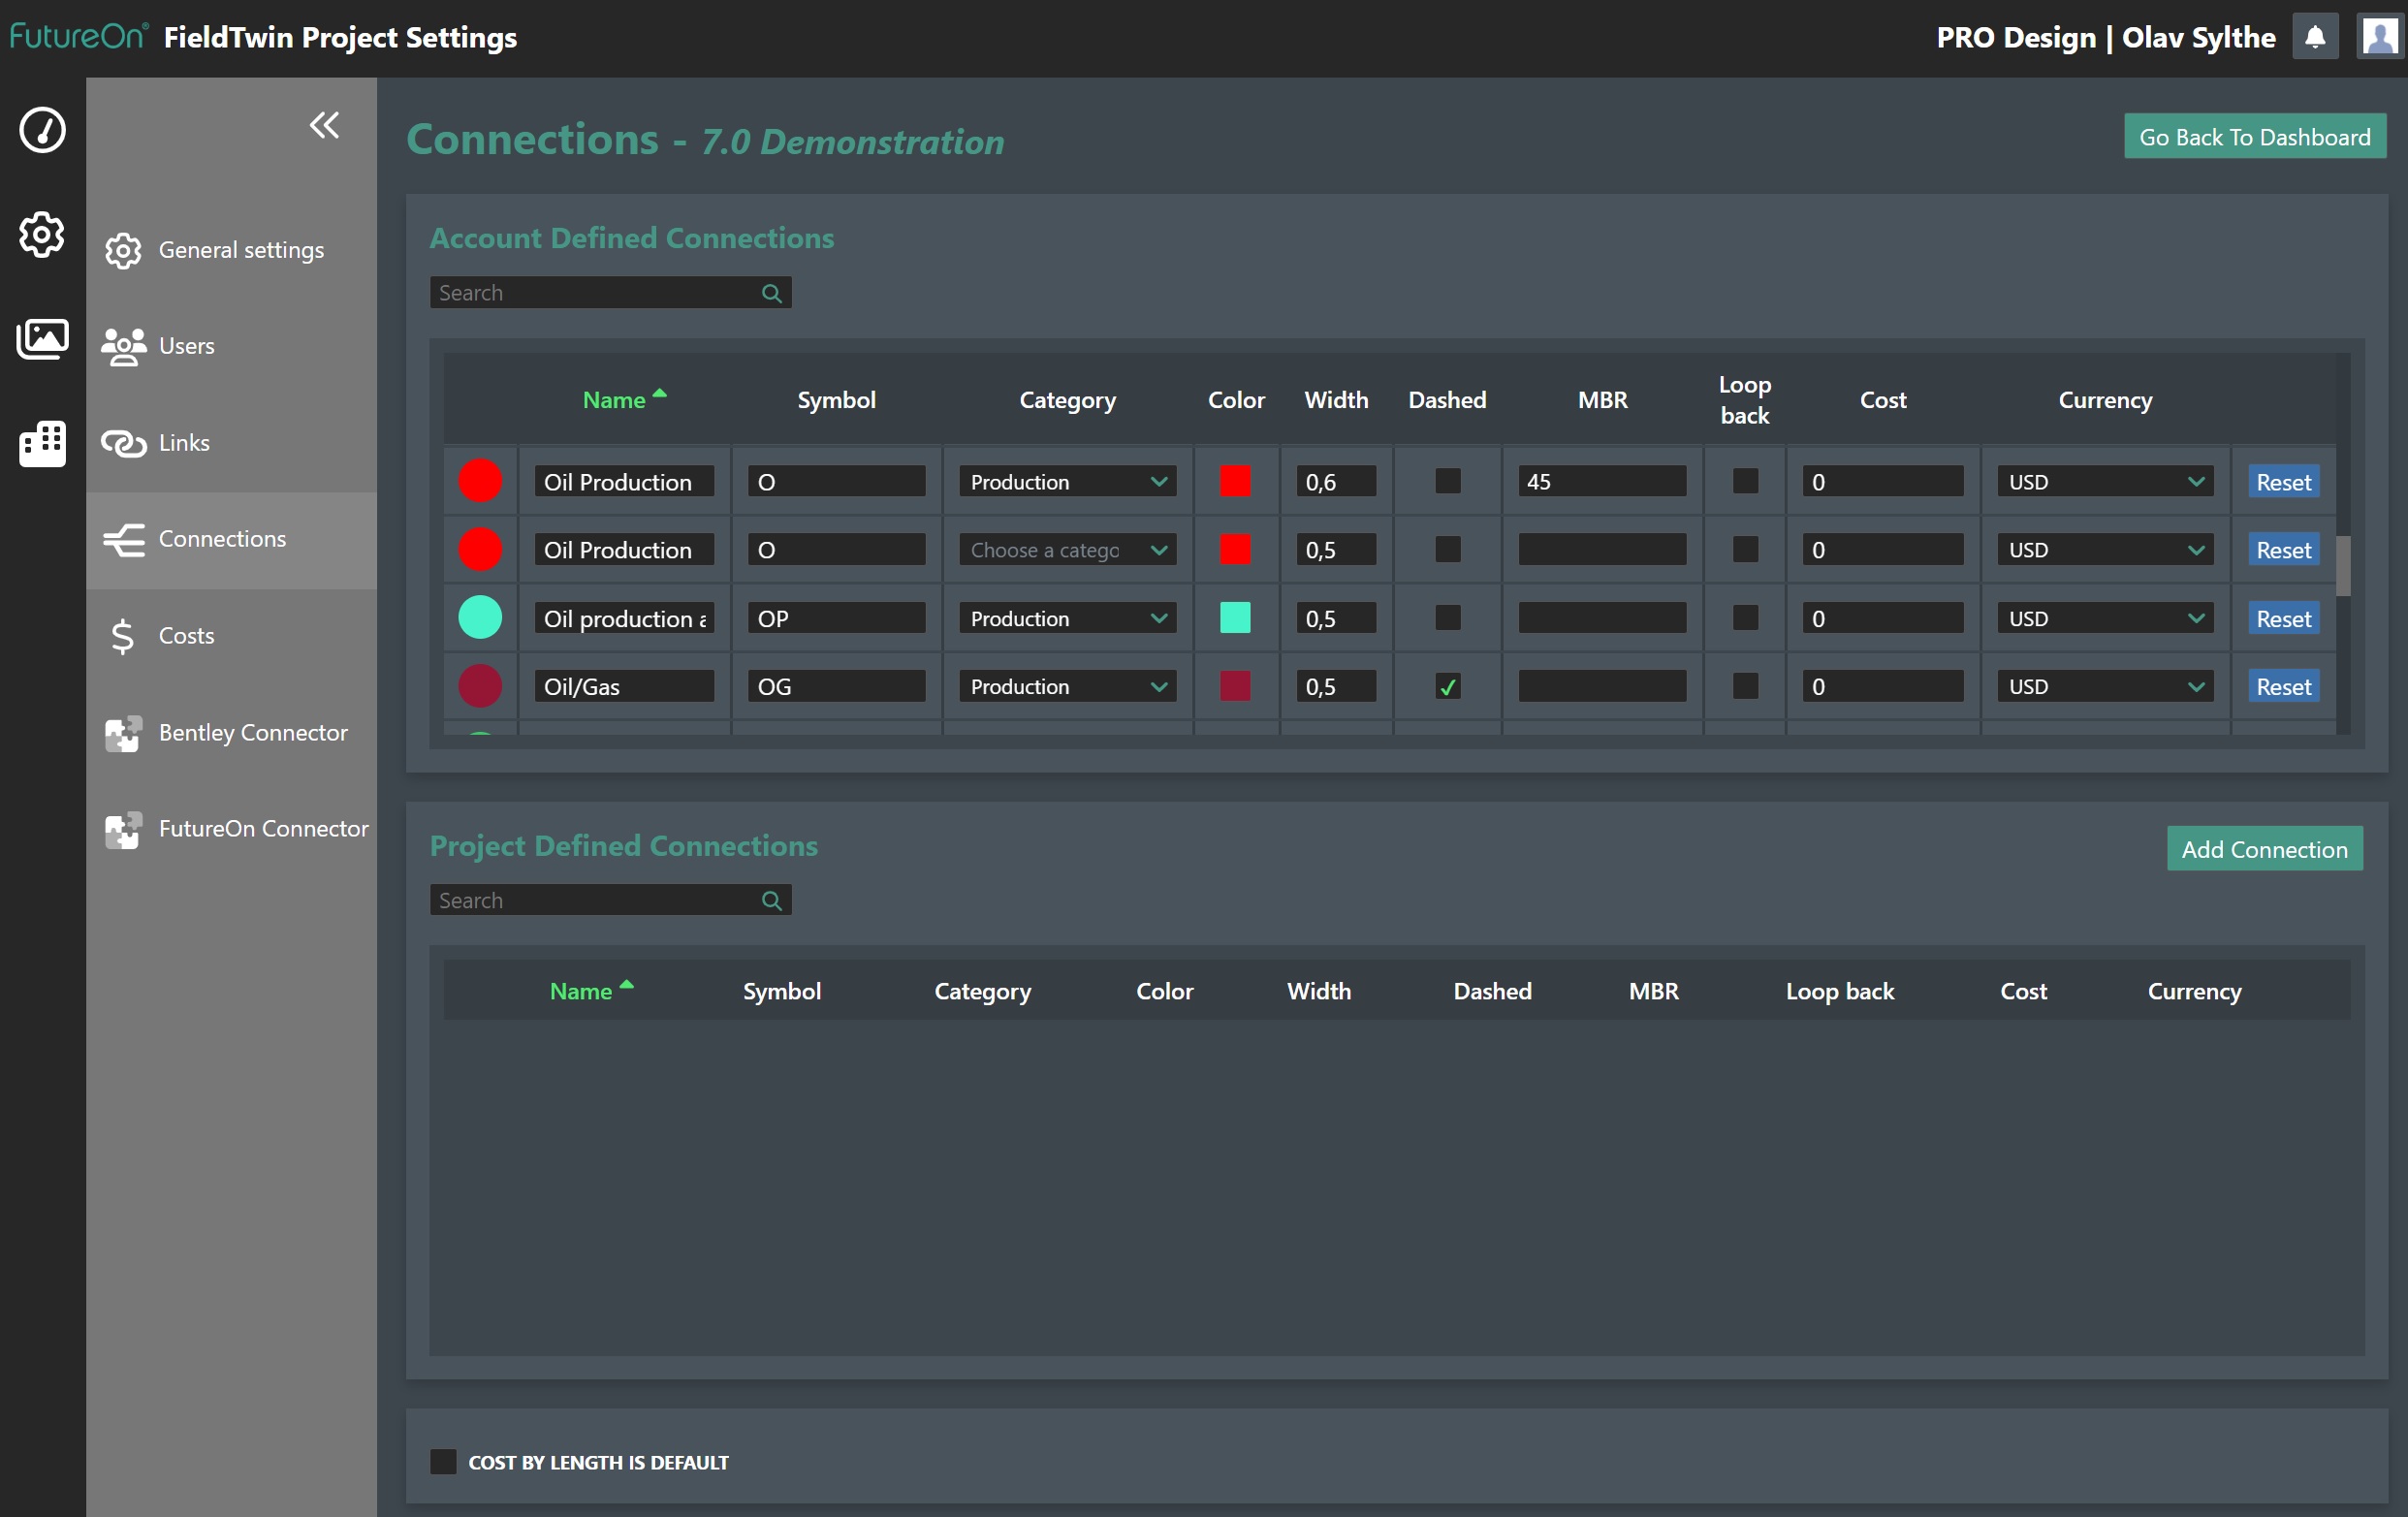
Connections
This screen will show all the defined connection types for the Account and also the Project specific connections that have been defined:
Go Back To Dashboard - Press this button to exit project settings and return back to the dashboard.
Account Connections
The account defined connections are set up by default for your account using FieldTwin standard connections, and can only be changed with admin privileges.
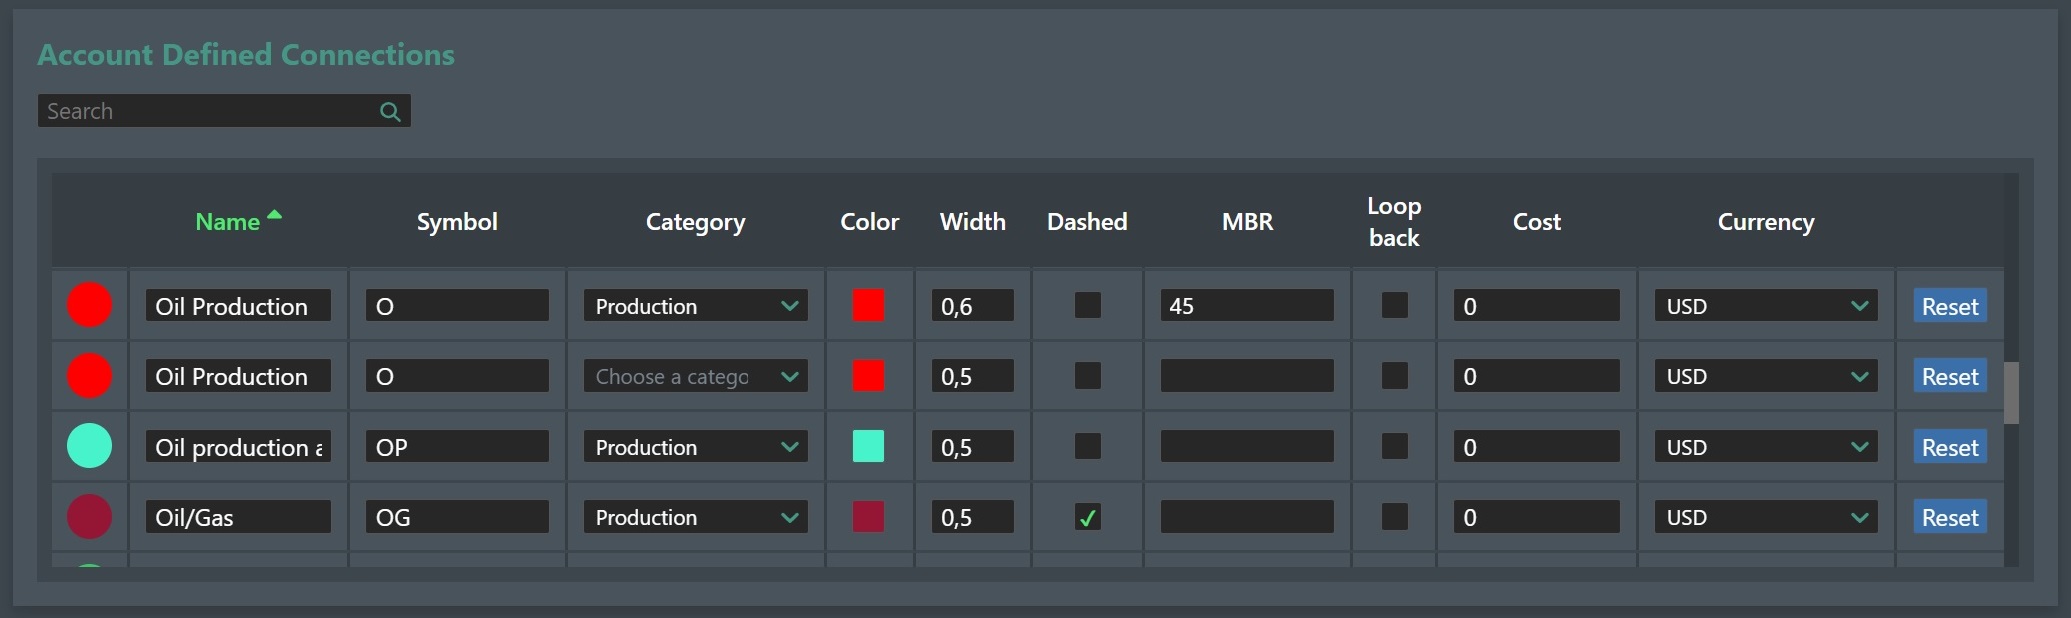
The connections table has the following columns from left to right:
Color Icon - This displays the current color for the account connection type.
Name - This is the name of the connection.
Symbol - The symbol designation for the connection e.g. GI for gas injection.
Category - Select the category of your connection e.g. Umbilical, Production, Water Injection, etc.
Color - Click on the color rectangle to display the color pick that allows you to select a new color for the account connection type.
Width - Specify the width of the connection. Valid inputs between 0,1 and 2.
Dashed - Check this is you want the connection drawn as a dashed line.
MBR - If you will be using the Bend Radius design tool you can specify a default bend value radius here.
Loop back - Check this to connect a connection to the same asset at both ends and create a ‘loop. After opening your project in FT design your connection can now be connected at both ends to the same asset
Cost - Use this field to enter a cost for the connection type. Check the Cost by length is default at the bottom if the cost is per length unit.
Currency - Select the currency for the cost from the drop down list.
Reset - this will reset the Account Connection to the default value.
Project Defined Connections
The project defined connections are defined and used for this project only.
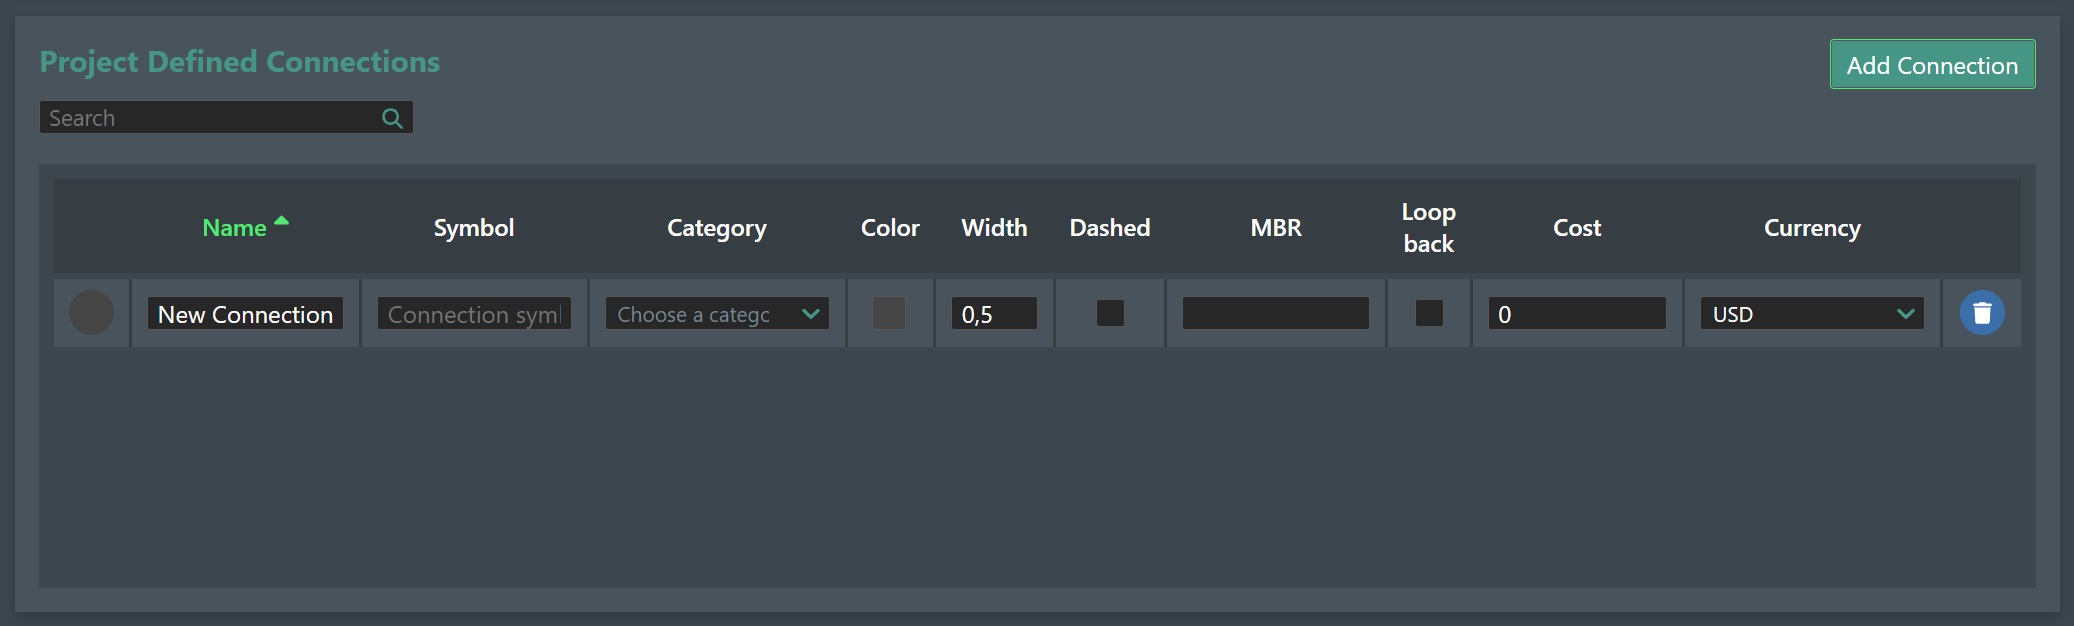
Add Connection - Press this button to add a new entry in the table.
This will use the same inputs as described above, but these connections will only be visible for this specific project. Note! - Meta data for custom connections are not supported!
Cost by length

Cost by length is default - Check this box if you want the cost should be calculated per the connections length unit.
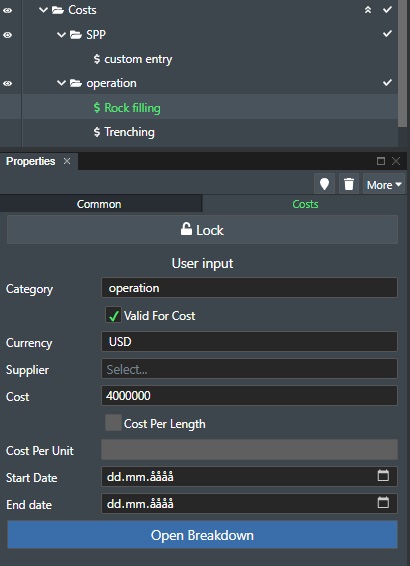
Costs
This page displays both the account costs defined in FieldTwin admin, and costs specific to the current project if any.
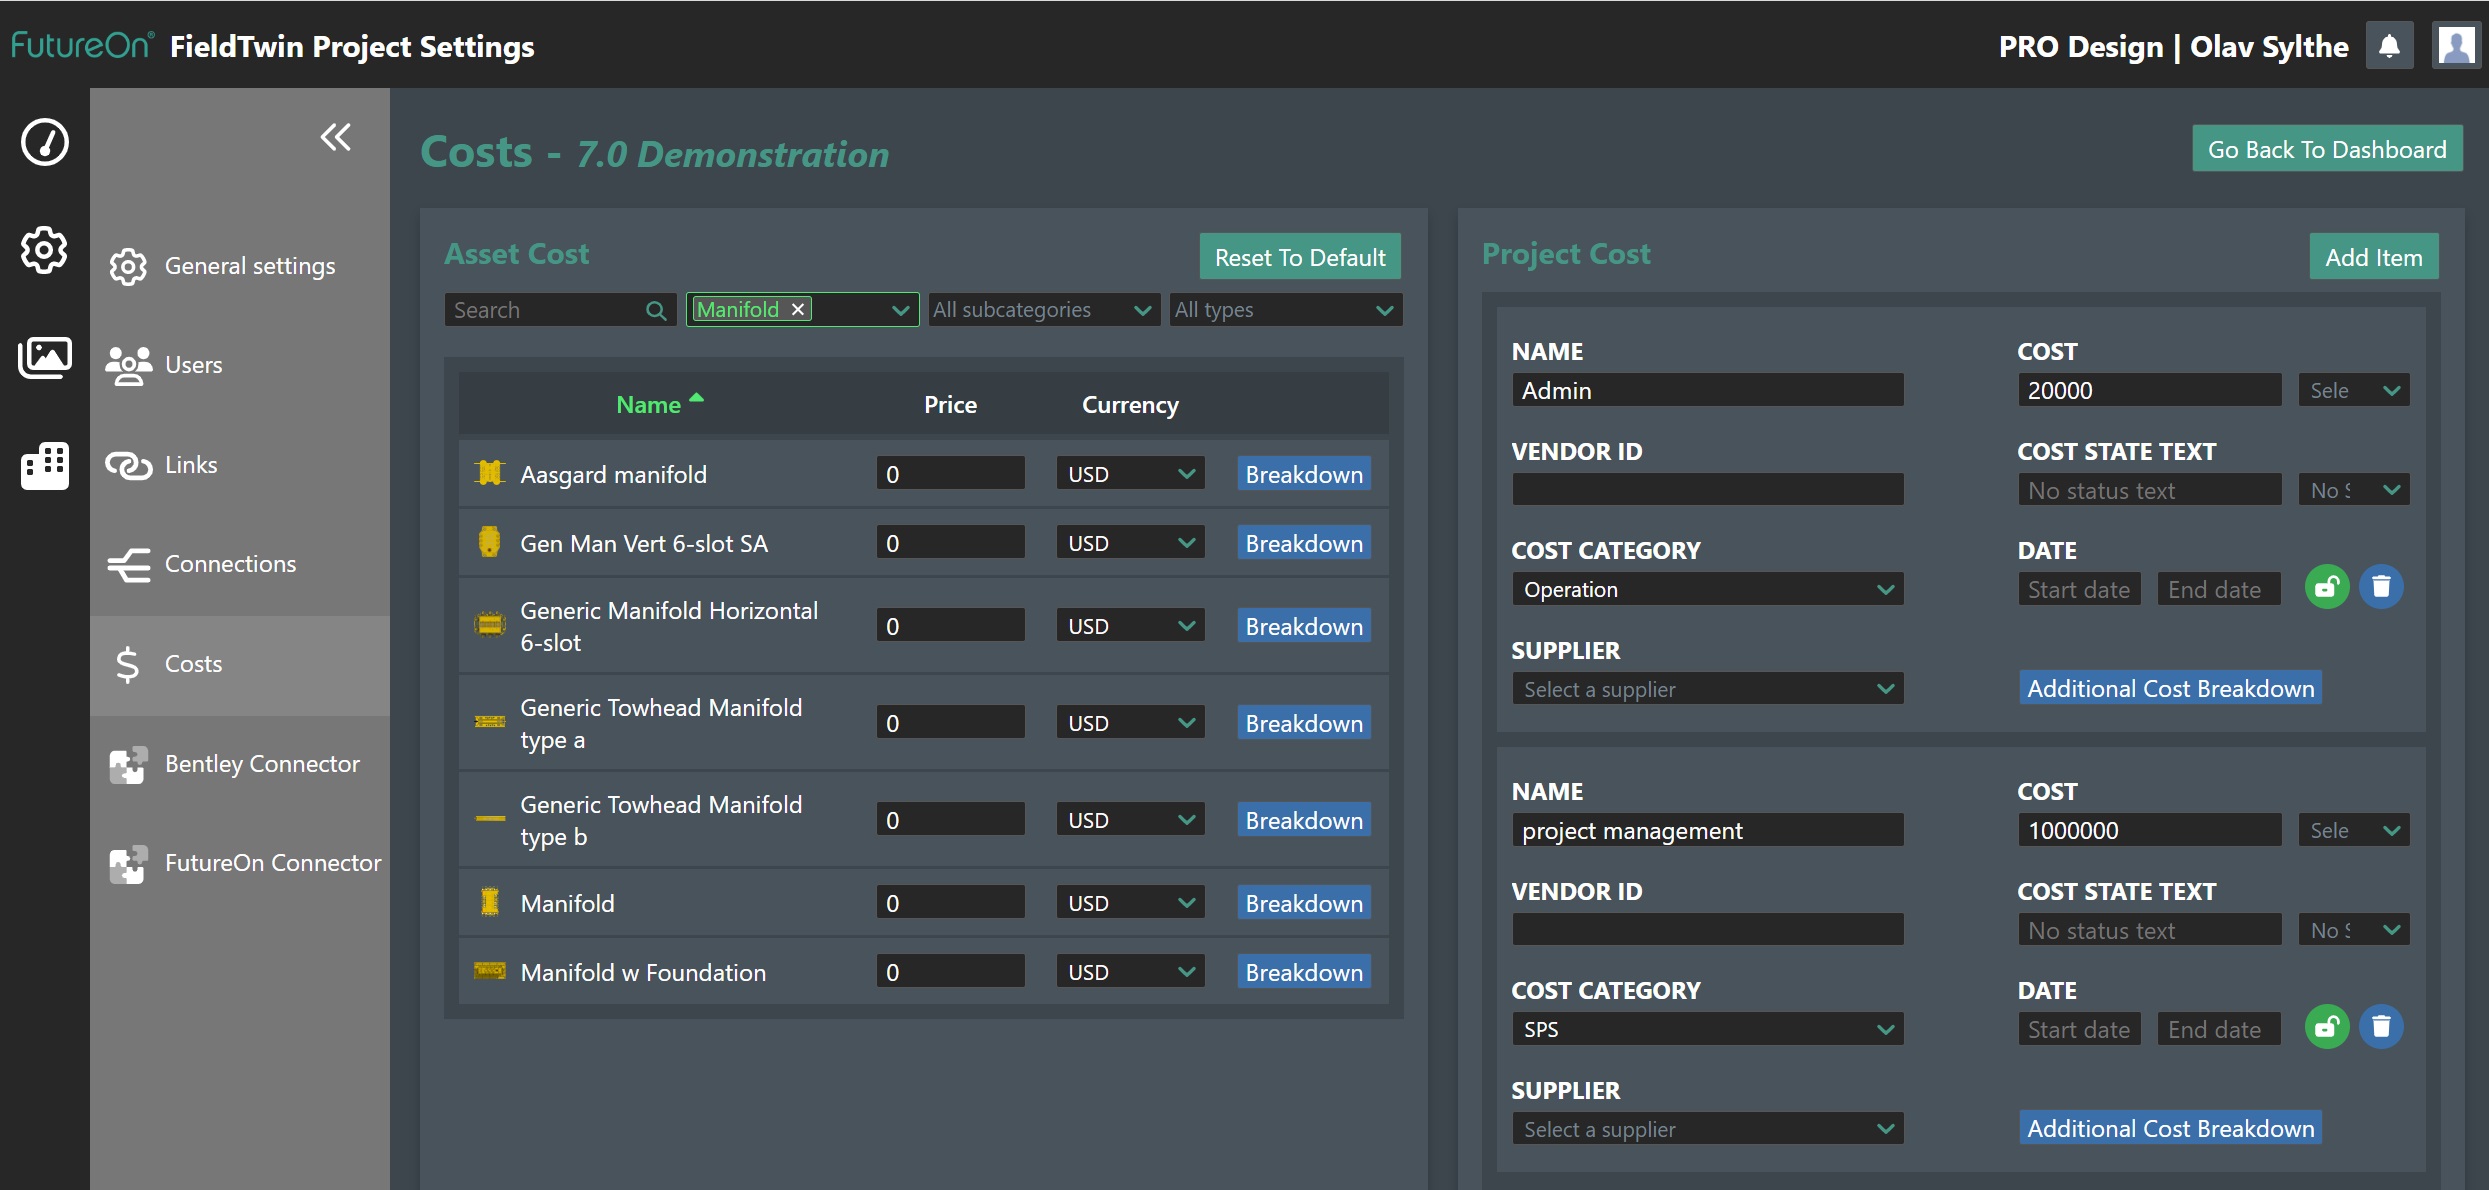
Go Back To Dashboard - Press this button to exit project settings and return back to the dashboard.
Asset Cost settings
This section displays the Asset Costs as defined for the Account cost settings set by FieldTwin Admin. You can change these costs here, but then they will only be valid for this project and any sub-projects from that moment on. Note! This will not change the default Account Costs if defined.
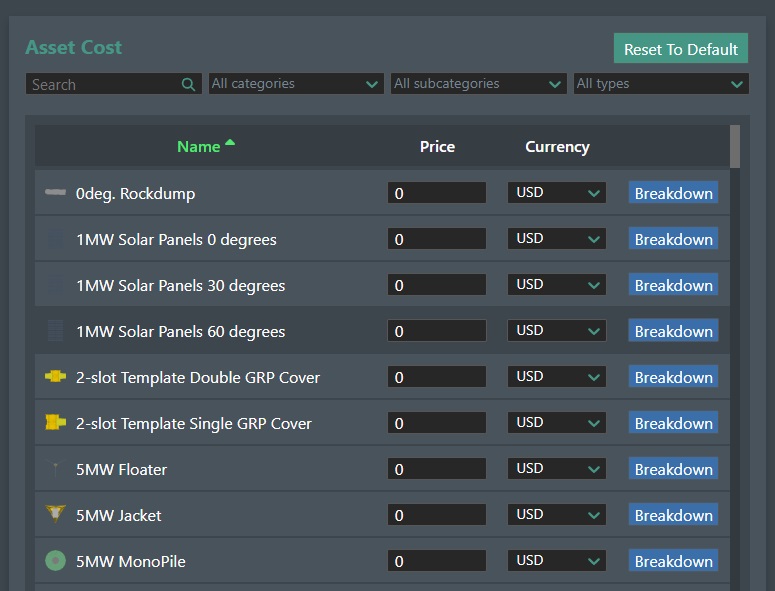
You have the following options available to search, sort and narrow down the list:
-
Search - This allows you to start entering an asset name and the list will search and update based on the name entered.
-
All categories - This drop down list will allow you to apply category filters so only the selected categories will be shown e.g. "Template", "Host" etc.
-
All subcategories - Select sub-category filters if any to apply to the listing.
-
All types - Select the asset type from the drop down list and choose between "structure", "vessel", "submerged" or "virtual".
To assign a default cost on an asset for your project, simply modify the Price field next to the asset, and assign the appropriate Currency in the drop-down list to the right of the "Price" field. You also have the possibility to break down asset cost into itemised parts and assigning individual cost for each sub part. To do this simply click on the "Breakdown" button.
This will display the dialog for assigning "Cost" for individual parts as shown below:
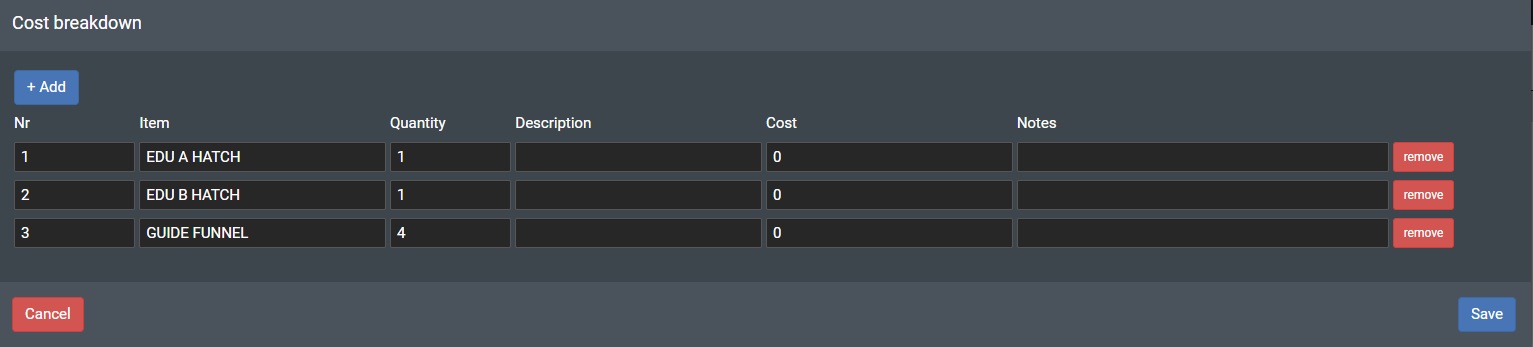
To assign cost for an individual part, simply click on the "+Add" button to add a new line for each part that you wish to assign the cost for. You can add information in each of the following separate fields; Nr, Item, Quantity, Description, Cost, and Notes.
To delete an item from the list, simply click on the Remove button to the right of the "Notes" field. When you are done, click on the "Save" button to accept the entries made. To exit, click the "Cancel" button.
Reset to Default - Press this button to revert any changes made in the project back to the Default Account cost values.
Project Cost Settings
This section allows you to add new custom project cost items to this project only. If you want to do this for all new projects you must use the Account Settings instead.
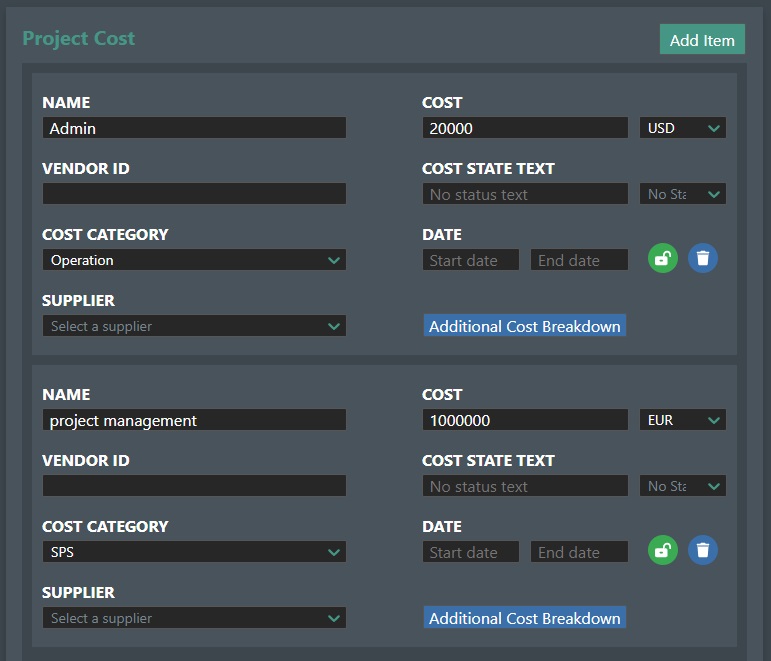
Add Item - Press this button to create a new entry and then you can populate the fields as follows:
-
Name - Enter the name of the cost item e.g. Admin Overhead.
-
VendorId - Enter the associated Vendor ID if any.
-
Cost Category - Select the corresponding cost category from the drop down list. Select from "SPS", "SPP", "platform", "vessel", "rig", "piping", "umbilical", "operation" or "generic".
-
Supplier - Select an existing supplier, or enter a new supplier if needed.
-
Cost - Enter the new cost value, and select the corresponding currency in the drop down list to the right.
-
Cost State Text - This field is if you have a cost server connection with your account and you want to display a specific message linked to the cost state. The corresponding Status can be selected from the drop down list to the right comprised of "danger", "primary", "warning", and "info" states.
-
Date - You can enter a start and end date that the cost applies to if any.
-
Lock - Press the padlock icon to change the state of the cost entry between locked and unlocked.
-
Delete - Press the "Delete" button to delete the cost entry.
-
Additional Cost Breakdown - You also have the possibility to break down asset cost into itemised parts and assigning individual cost for each sub part. Please see Additional Cost Breakdown.
The new costs you define here will also show up in Project View in the Custom Costs section as shown here:
Workflow
To switch from Project Details view just click on Workflow to show that view.
See the documentation for FieldTwin Workflow for more information on how to use Workflow.